


HEY Y’all! Welcome back! I am so happy you’re here! Stephanie here again from Coffee Stamps Chaos with another fun project for you this month, featuring Cardstock Warehouse cardstock, Whimsy Stamps Dies, and a few basic supplies.
I am so glad you’ve chosen to spend a few minutes with me as I share my latest project with you! I had a lot of fun creating this project and found myself thinking of the next project I wanted to make.
Sometimes I find a technique that really makes me want to duplicate it over and over and watercoloring on White Diamond Print Glitter paper is one of them. The possibilities are endless! I love this paper and have found so many different ways to use it, from printing on it, to using it as is, watercoloring on it & ink smooshing, to name a few. If you want to learn some different ways to use it, you can check out my previous blog posts for more ideas. I’m sure there are other ways to use this Cardstock as well; and I will likely find more of them in the future. I’ve used this Cardstock in a variety of ways and it is honestly one of my top three favorites, along with Sirio Ultra Black, and the Wood Veneer Collection. It’s so versatile and I find myself reaching for it often!
Without further adieu, let’s get down to the business of creating this fun card!
SUPPLIES
I used the following Cardstock Warehouse Cardstock Papers for this project:
- Imperial Blue 100lb
- White Diamond Print Glitter
- Silver Mirrisparkle
- Pure White 100lb
Other supplies used:
- Whimsy Stamps Dies
- Slimline Stars Background
- Slimline Birthday Scallops
- Watercolors
- Waterbrush
- Acrylic Stamping Block
- Foam Tape
- Bearly Art Precision Craft Glue
- Scor Tape ¼”
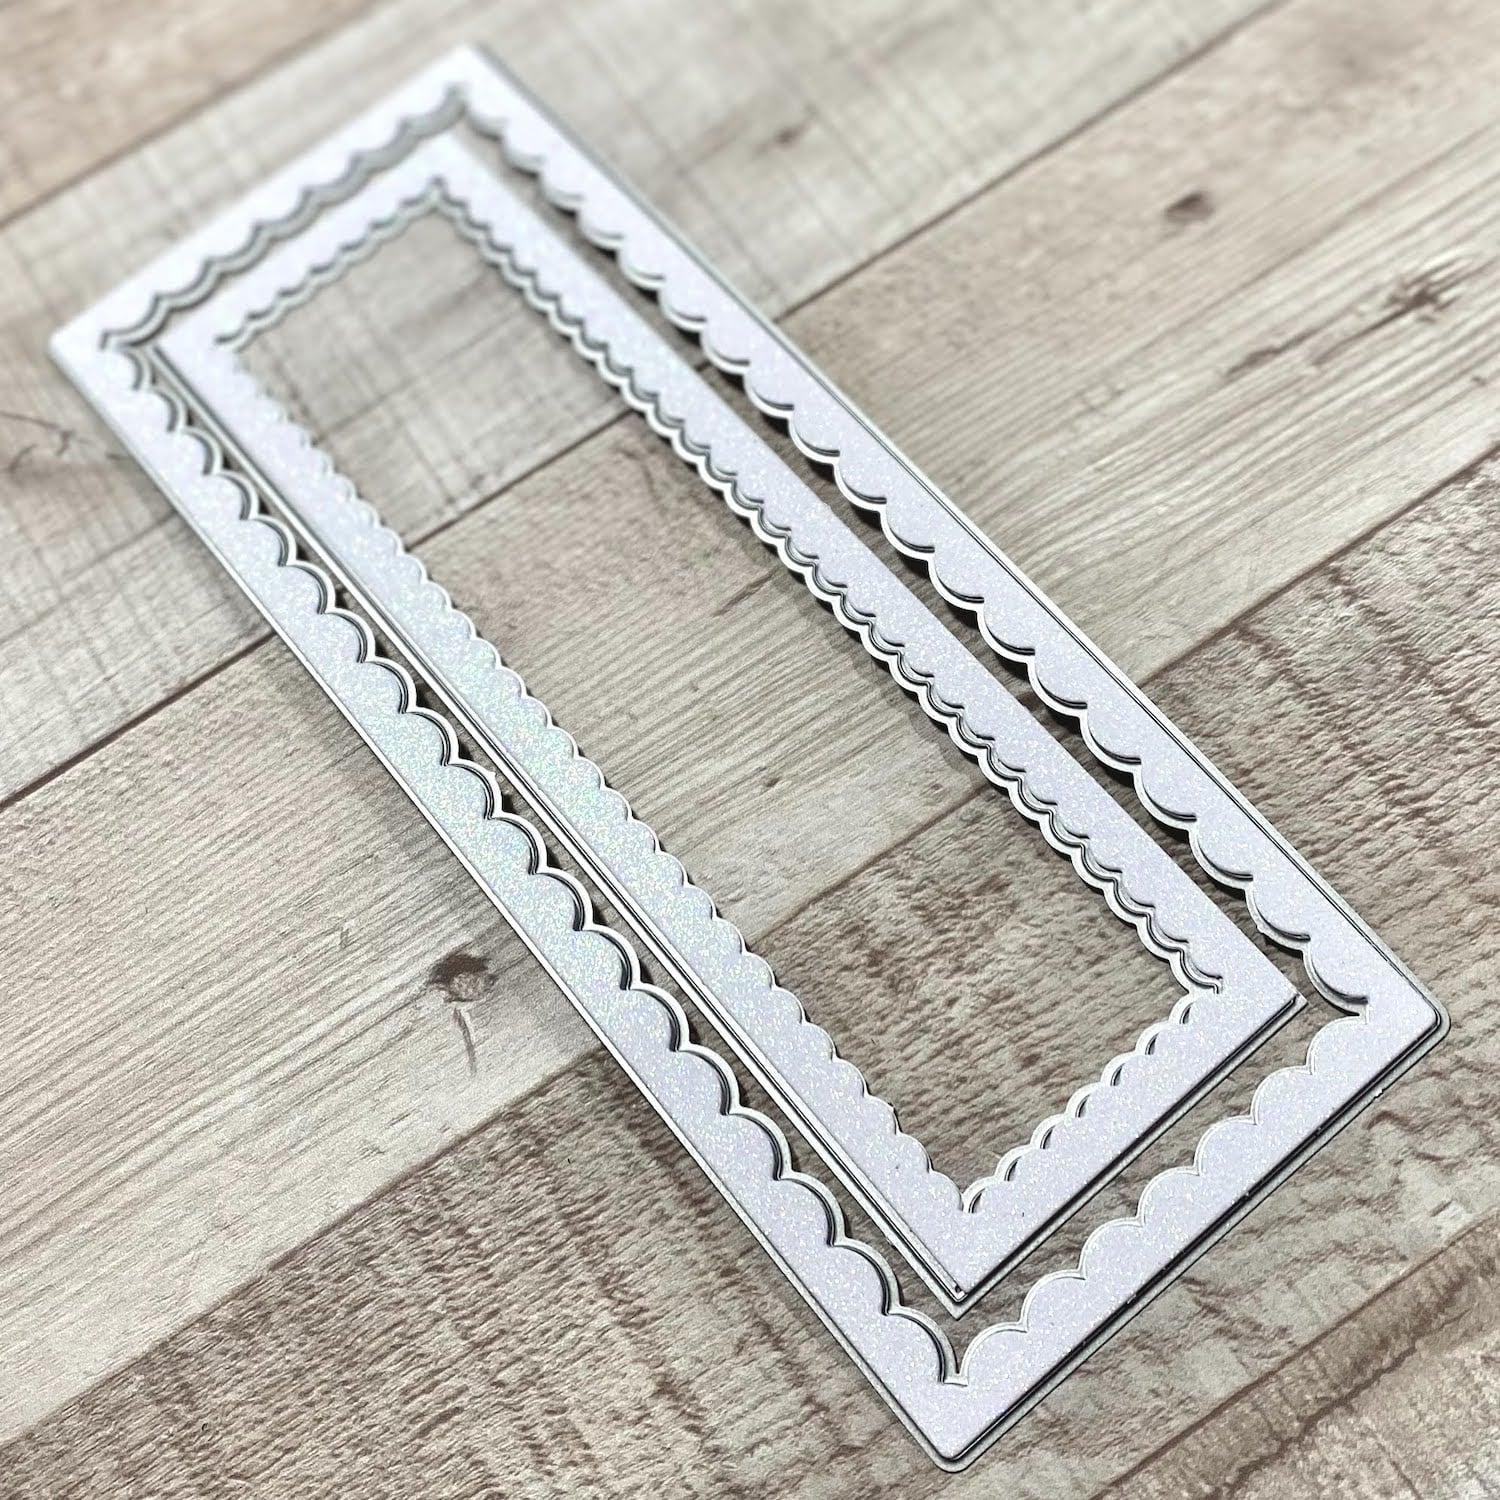
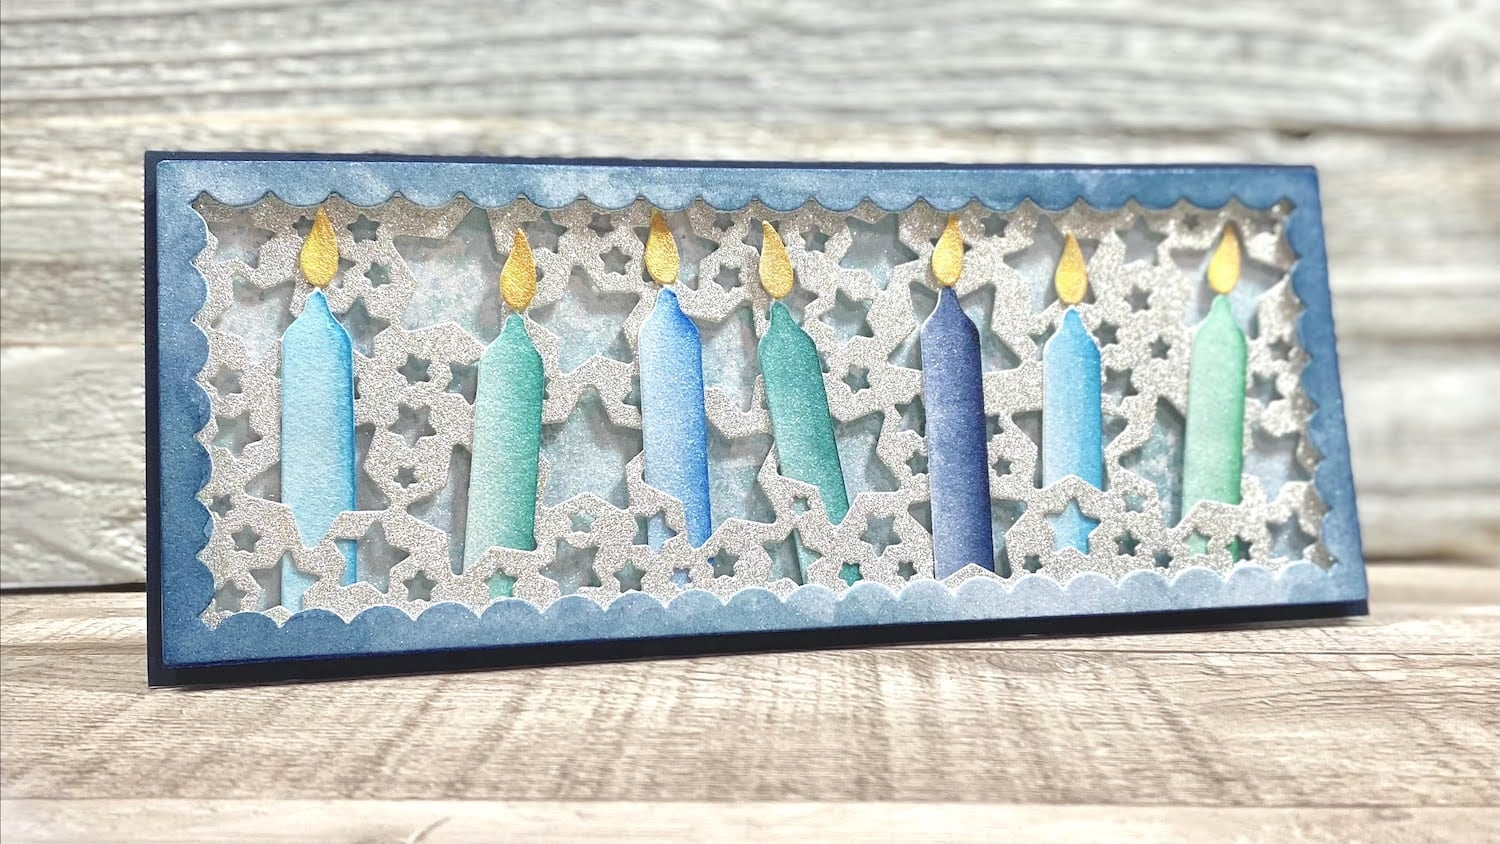
I always start by selecting my Cardstock and die cutting the elements I plan to use for my card. I knew I wanted to use multiple candles, so I die cut about 10 of them, in both White Diamond Print Glitter & Pure White 100lb.

I did the same with the Scalloped Frames - cutting one each out of Diamond Print and Pure White. I adore chunky layered die cuts, I personally feel it adds so much more interest and depth to die cut images. For this project I just did a 1:1 ratio : one glitter candle + one white candle, as with the Scalloped Frame. Cutting extras will give you room for error as well, in case you mess one up or anything like that, if you don’t use the extras you can always add them to your stash for later use.
Next I die cut the Slimline Star Background out of Silver MirriSparkle paper. I cut out a few of them because I have another project I wanted to use them for so I just did it all at once. For this project you just need one. I also saved the cut out stars for future projects because I hate to waste Cardstock! In my craft space you are always likely to find random die cuts in a basket. I tend to reach for these random bits before cutting new stuff. I also keep reasonable sized Cardstock pieces as well because I can’t stand to waste my beautiful Cardstock Warehouse Cardstock!

I knew I was making a slimline card because of the dies I was using, so I cut one sheet of Imperial Blue Cardstock down to 7” x 8 ½” scored at 3 ½” to create a horizontal slimline card base. Then folded it and used a bone folder to press the folded edge. I also cut a piece of DiamondPrint Cardstock down to 3 ¼” x 8 ¼” to use behind the Star panel.
Once I have my die cut elements, I move on to bringing them to life, this time I used watercoloring for that. Watercolor the candles using a waterbrush and your choice of watercolors. I really love to use pan watercolors for this because the color is easy to manipulate and produces consistent results depending on the amount of water you use. I prefer using a waterbrush for this very reason, it gives me a lot of control over the amount of water I apply.

Here I show what colors I used, but you can choose colors that make you happy. I chose to go with blues and blue greens, because I felt that they would make this card more versatile. I colored the candles and frame and then Ink smooshed the background by applying color to an acrylic stamping block and using a piece of acetate to pick up that color and transfer it to the 3 1/4” x 8 ¼” DiamondPrint panel to your liking, you can add color but you can’t take it away, so do this until you like the end result. If you allow it to dry completely, you can easily layer the color.

Once everything has been watercolored, you will need to wait for it to dry, it doesn’t take long, about 5-10 min or so. You want to make sure it is completely dry before you assemble it, otherwise you’ll get all inky. Once everything is dry, layer the candles - adhere your candles together using Bearly Art glue with the glitter one on top and the Pure white one on the bottom. Do the same with the Scalloped frame
Once the pieces are all layered you will want to do a dry fit to see where you want the candles - I put mine through the die cut stars in the background then used washi tape on the front to hold them in place. It’s up to you where you place your candles, they can be placed over the background under the scalloped frame if you prefer.

Once the candles were placed to my liking, I put foam tape on the back of the layer to hold the candles in place, as well the rest of the back, this is done to create a popped up layer. I trimmed the candles so they were just short of the edge of the background as well as added foam tape to the back of the scalloped frame and set it aside.

Once the foam tape is applied, it’s finally time to assemble the card! Remove the backing from the foam tape on the main panel, and adhere it to the ink smooshed layer, lining up the edges so it is aligned. Then add the scalloped frame, I always only remove the backing partially along long edges, so I can line up my panel easily and I can reposition it if needed. Once I have the edges aligned, I press the corners in place then remove the remaining backing and apply pressure to ensure a secure fit.

After the main panel is completed you want to put it on the card base. I used Scor Tape for the back of the main panel, and used the same partial exposure of the tape, aligning the panel then removing the remaining backing from the tape.

I almost forgot to add the “flames” to the candles, so I quickly watercolored them up and glued them on using Bearly Art Precision Glue.

Thank you for joining me today! I appreciate that you took the time to spend here. I hope you enjoyed this tutorial and I hope you will share your creations using Cardstock warehouse papers with us so we can oooohhh and aweeee over your projects!
You may even be featured on the Cardstock Warehouse social media platforms. You can use the hashtags #cardstockwarehouse & #makesomethingbeautiful for a chance to be featured on our Instagram and Facebook pages!
If you’d like to, you can follow me on social media to see what I’ll make next at the links below my name. I would love to see what you create! I love to support and encourage other crafters!
Make something beautiful!™
Sincerely,
Stephanie Vittorio
Facebook: Coffee Stamps Chaos
Instagram: Coffee Stamps Chaos