


I know I’m not the only one who wants summer to last forever. As a child I used to love running around the backyard while my mom was hanging the laundry on the clothesline. Across the street you could see kids playing with the water hose.
At night, we would make pallets and makeshift tents and watch the stars. Feeling a soft cool breeze on our skin made us fall asleep easily. And sometimes on the weekends…we’d sit around on old tree logs and make s’mores. Sometimes they were made traditionally with tree limbs and sometimes we made them in tin foil packs. But either way, they were yummy and delicious.
So now, as we sit here with the summer wrapping up, at least where I am… I am remembering a good time in my childhood. So I bring to you a S’more that can last forever. Although, I wouldn’t try to eat this one, lol! Let me show you how I put it together.
This project is not only cute and colorful, it uses several recycled cardstock papers, and all of the paper used in this project is made with eco-friendly standards to make is extra-yummy 😋
SUPPLIES NEEDED:
- Cardstock Warehouse Cardstock Papers
- PAPER BAG KRAFT (recycled)
- HOT FUDGE BROWN
- PINK LEMONADE
- SMART WHITE
- GUMDROP GREEN
- SIRIO ULTRA BLACK
- BROWN SPECKLETONE (recycled)
- CHOCOLATE BAR BOX CUT FILE
- S’MORE SENTIMENT
- WET GLUE
- SCOR-TAPE
- HOT GLUE
- POP DOTS
- SEQUINS (OPTIONAL)
- ALUMINUM FOIL (OPTIONAL)
- PATTERN PAPER (OPTIONAL)
- SWIRL LEAF DIE (OPTIONAL)
- FLOWERS (OPTIONAL)
- SEWING MACHINE/NEEDLE & THREAD (OPTIONAL)

I like to start off with the hardest or longest thing first. So today we’re going to start with the chocolate gift box. I saw this file and absolutely had to have it. I caught it on a day where it was $.50. Deal! There is a tutorial on how to put it together. I will link it here. But I’ll also give you short snippets on how mine came together.
I started off with the chocolate pieces that sit on top of the box. I’m calling these my “chocolate nuggets”. There are five rows of three. All you have to do is fold together inward at the perforated marks. The corners come together easily, you just have to be patient. It folds in - hill and valley - on the corners. It should bring you to a nice crisp edge.

Go ahead and cut out the box. I used the Hot Fudge cardstock for my entire chocolate bar, of course! Put the two pieces together and use double-sided tape to attach. Once the box comes together, it’s time to add the little chocolate nuggets to the top of the box with hot glue. Be sure to stack them close together so that they will all fit on top of your gift box. I love the idea of making it look like a candy bar you get from the store, so I added aluminum foil as well.

I then topped that with some pattern paper I had in my stash. I folded over the paper and lightly pinched together to create handmade score marks. Then I took my bone folder and made them nice crisp scores.

I wanted to add a little decoration to the top. So I grabbed my Gumdrop Green card stock and cut out a swirly leaf die. I used flowers from my stash, this time. 🥴 I think it turned out so pretty!

The beautiful thing about using SVG files is that you can alter them and resize them as you wish. I resized mine to have a finished card of 4 1/4 x 6. All of my offsets are 1/4” thick. Be sure to measure and size your SVG file according to the size you desire.
I cut my card base out in Smart White cardstock down to 6 x 8 1/2. I scored it in half. This creates a card base of 6 x 4 1/4.
Then I cut my Hot Fudge Brown, Paper Bag, and Pink Lemonade to size. Each going down in size 1/4 inch. I did this for the inside matting as well. But we’ll get to that in a couple more shots. 😉

I took my Pink Lemonade pieces and stitched around the edges with some brown thread. I tried to match the hot fudge color of the card stock. This is optional. To create the least amount of bulk, I used wet glue to stack all of my layers together. After I laid my layers down on the front of the card stock base, I wanted to add a little bit of pizzazz. I made a small sequin cluster of three for the left and right corners.

I did the same layering technique for the inside mats. This time I used Pink Lemonade, Paper Bag Kraft and Smart White card stock. I did the same stitching on the Pink Lemonade with the brown thread. Since I did not have a s’more stamp, I went searching for one that I could use. Again, I paid $.50 for this file and I absolutely love it. I use my silhouette ink pens to get those sketched on. But any stamp will do. Or if you like your handwriting, use that! In my case I don’t, so sketch pen it is, LOL!

I’ll put those layers together with wet glue and added a little personal touch in my handwriting! (This is exactly why I use stamps and sketch pens 🤷🏽♀️)

It goes super fast from here so hold on tight! This is how the layers come together in order.
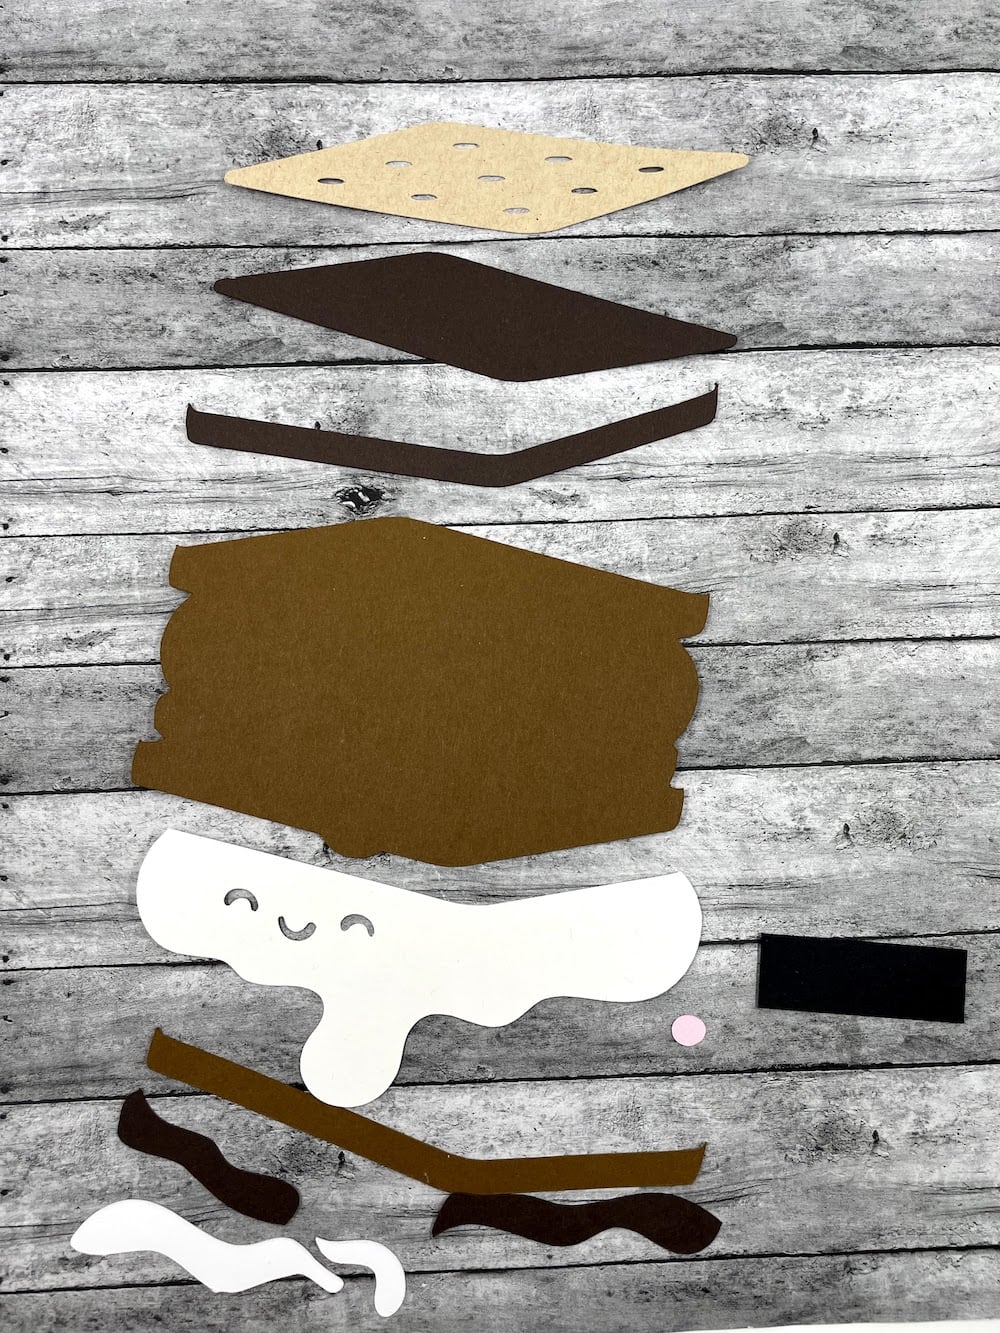
I have some old brown ink that I use for light distressing. I grabbed myself a little cotton ball, because I don’t have any of those cute little daubers, and gently went over the top of my “graham cracker crust”. I love the natural flecks in the Paper Bag Kraft recycled cardstock. Once I was satisfied with my “toasted” finish, I put it together with wet glue.

Now we’re moving on to the marshmallow puff, the eyes and the blush. Because every s’more that I’ve ever eaten has blush, right? 🥴 The black rectangle (Sirio Ultra Black) goes behind the eyes and the smile of the marshmallow puff (Smart White) and of course the blush (Pink Lemonade) dots go on the cheeks.

Lay the finishing component on top of the s’more base. (Speckletone Brown) Don’t adhere the drizzle of the marshmallow puff - the bottom piece - we will be adding a couple more layers underneath.

I also distressed two small outline pieces with the brown ink. I like my s’more’s nice and toasty. I cut out an extra layer in Hot Fudge cardstock, because I like a lot of chocolate on my s’more. And I added that to the top. ☺️

Going back to the top graham cracker crust, I added foam tape to give it a little bit more dimension. I added a little bit of hot glue to secure it to the top of the s’more base.

I told you that I like extra chocolate on my s’more, so I added the two small layers in the Hot Fudge cardstock at the bottom...underneath the marshmallow puff. Yummy!

The final two pieces which are the edge of the graham cracker crust, I laid underneath the marshmallow puff. Secure the marshmallow drizzle to the card base if desired.
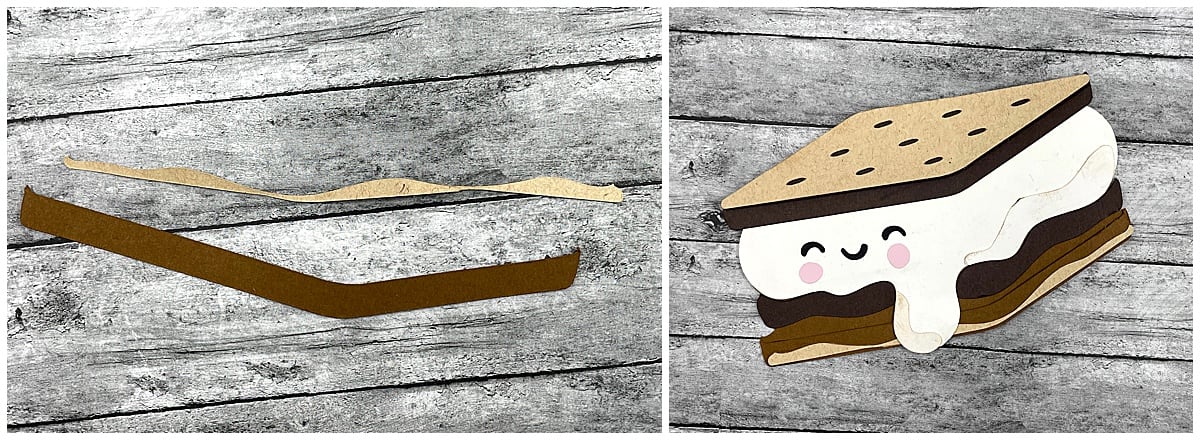
To make my s’more pop off the card I added foam tape to the back of the entire piece.

This looks so nice! I love it!!

See?? I told you this would be adorable! Now you have a forever S’more and chocolate bar! Do you love it??

Please be sure to leave a comment to let us know what you think. If you’re super fancy – tag us in your creations on Facebook or Instagram. You can use the hashtag #cardstockwarehouse to be featured on our page!
Toodles!
Tmika
YouTube