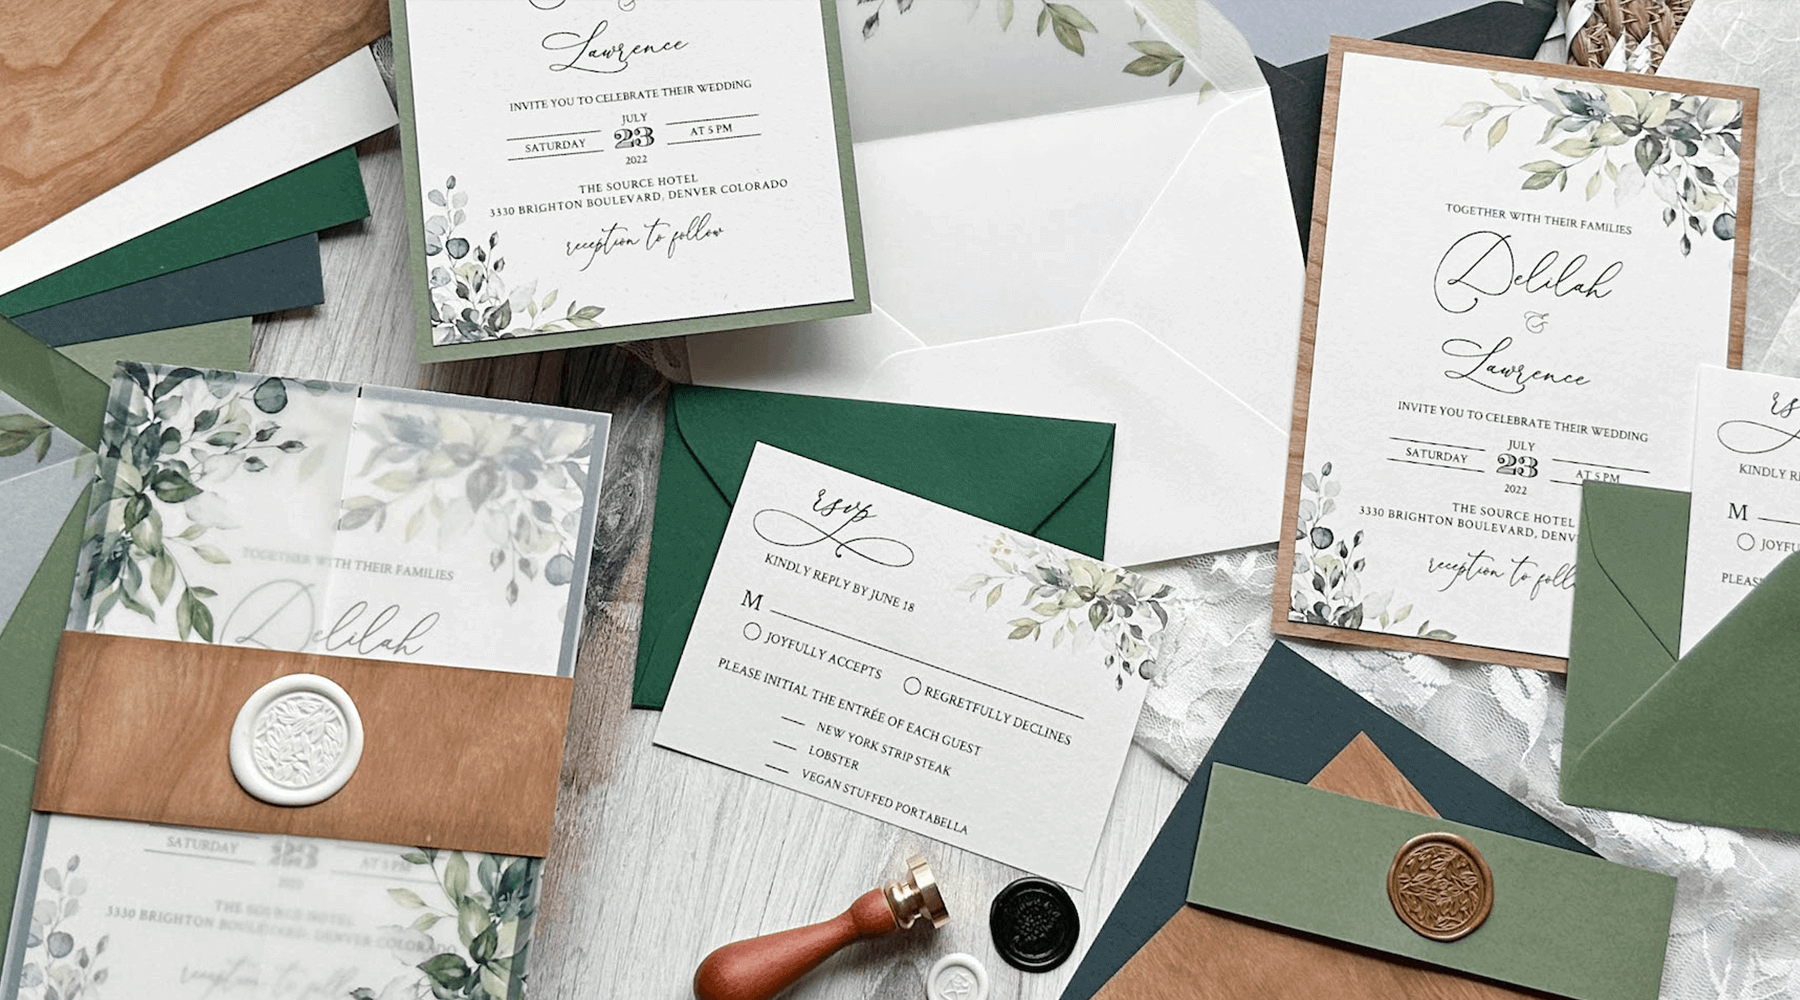
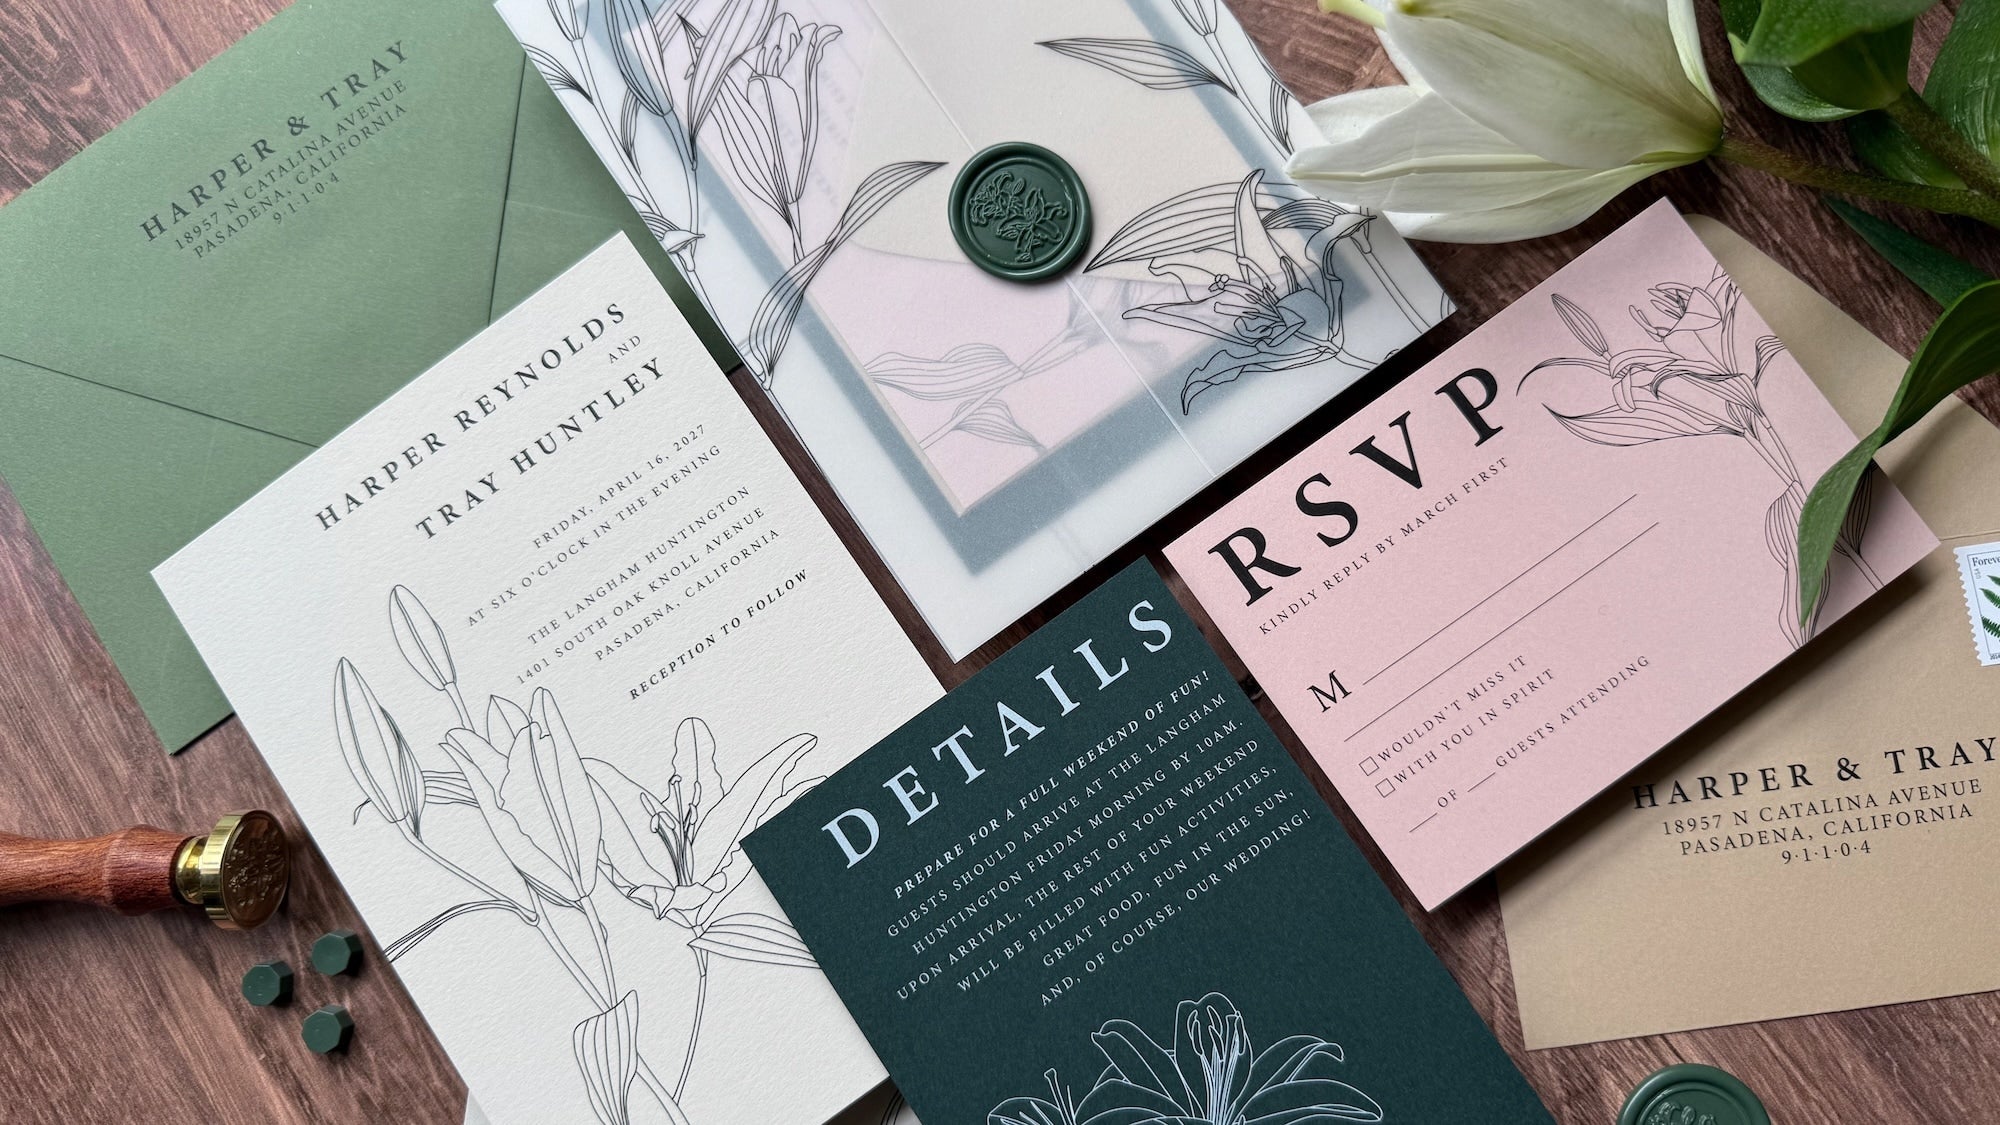
We Print Your Design
Welcome to our premium printing services, where your visions come to life on our exquisite paper lines. Whether you are a professional designer or DIY creator, we understand that every project deserves the finest canvas. That's why we offer a carefully curated selection of high-quality paper and print options to suit your unique needs.
Create stunning invitations, special event paper goods, captivating greeting cards, professional business cards and more. Our paper lines provide the perfect backdrop for your creativity to flourish, and our team's commitment to exceptional craftsmanship ensures that your prints will radiate sophistication and leave a lasting impression,
🌿Beautiful Selection of Premium Papers and Envelopes
🌿Black Ink 🌿Full Color Ink 🌿White Ink 🌿White Ink Underlayer
🌿Variable Merge 🌿No Setup Fees
Printing Services
-

Product Offerings We offer products in a wide range of formats, sizes and paper choices. 🌿Shop Print Products to explore the many options. Visit 🌿Shop Print Proofs to order a single copy of your design and make your full order with confidence.
-

Variable Data Merge
We offer complimentary variable data merge for place cards, escort cards and envelopes. Select your font options, upload your data and we'll take care of the rest!
-

Premium Papers
Every project deserves the finest canvas. Choose from a carefully curated selection of high-quality paper, envelopes, and print options to suit your unique needs.
-

White Ink Printing
White ink on colored media continues to be a popular design choice, and the results are stunning yet easily achieved. Just submit your file in black and we'll convert it for you!


Design Resources
Need a design? Design marketplaces such as Etsy, Creative Market, and Graphic River provide access to a wide range of pre-formatted and customizable template and design asset downloads for your next project, many at reasonable prices. The design work is already done for you, allowing you to customize your chosen design and let us do the rest!
NOTE: be sure to read reviews and ensure downloadable files meet print file requirements prior to purchase.
A Few Easy Steps
-

Select Print Options
-

Upload Your Design
-

Add To Cart & Checkout
-

Unbox Your Order!


🌿Ready-Set-Go: Getting Started With Our Printing Services
- Review our Printing Services Guide for full details on the printing process.
- Check the 🌿Print File Setup Requirements to prepare files correctly for our processes.
- Open a 🌿Customer Account to track orders and view order history easily.
- We recommend ordering a printed proof before committing to a full production run.
Online paper swatches are for reference only. If you're unsure about a paper type, color, weight, or finish, order a paper sample to see it in hand.
🌿The Skinny vs The Nitty Gritty
The Skinny: Basic guidelines for experienced designers appear in the dropdown sections on this page. These cover essential file setup requirements—ideal if you're preparing files via an online design marketplace or similar tool.
The Nitty Gritty: For deeper explanations, each dropdown includes a PDF attachment with detailed guidance on the topic. Use this if you need more background on the design or printing process.
Questions? Contact us anytime—we're happy to help!
🌿Behind the Scenes: Order Processing Information
Proofing & Ordering Guidelines
1. Physical Printed Proofs
We strongly recommend ordering a physical printed proof before your full production run. It lets you evaluate color, paper stock, texture, finish, and overall appearance exactly as your final piece will look. Proofs and full orders are placed separately.
2. File Review for Quality
To deliver the best results, our print specialists review every file for compliance with our requirements. To prevent delays, please carefully check the design file guidelines before submitting.
3. Print Proof Approval for Full Orders
When placing your full order, enter the proof order number to approve and reuse the same approved file.
4. Digital Proofs
Digital proofs are available for checking content, layout, text, and overall design. They do not accurately represent final paper stock, color accuracy, texture, finish, white ink, ink density, or substrate appearance. Screen colors are approximate only—your device’s settings, calibration, and limitations affect brightness, contrast, and detail. We guarantee printing on the selected paper with the chosen ink colors, but no screen can perfectly match the final printed result.
5. Ink Options
We print in black, full color, white ink, and white ink underlay. See
🌿Designing for White Ink for full details.
6. Variable Data
We offer free variable data merging for envelopes and place cards. See The Basics of Variable Data below for more information.
7. Production Quality
We use professional printing presses along with precision cutting and scoring equipment, staying within standard industry tolerances.
8. Processing Time
Orders are processed in 3–5 business days after we receive your order or final proof approval. Times may vary with seasonal demand or order size. We do not currently offer rush production.
9. Shipping
Shipping times, including expedited/rush shipping options, affect transit time after your order ships—they do not include processing time.
10. Discounts
Volume and trade discounts are available as listed on each product page.
Need Help? Questions? Contact us anytime—we’re here to assist!
🌿Choose Your Beautiful Canvas: Paper Collections for Printing

The perfect start to your special day begins with exceptional paper sourced from the world’s finest mills. Explore our extensive range of premium paper and envelopes to design a fully customized solution tailored to your unique vision!
🌿Paper Collections for Printing
Basic File Requirements
-

PDF FORMAT - 300 dpi minimum
-

SAFE ZONE = .125 inches
-

COLOR - CMYK Required
-

FONTS & STROKES - Outlined
🌿File Type

File Type: PDF
File Type for Advanced White Ink
PDF/x-1a:2001 or X-1a:2003 required
Minimum Resolution:300 dpi
Max File Size: 50 MB
File Background: Transparent
🌿File Dimensions & Bleed
Submit your files properly sized for your finished product, including bleed if applicable.
🌿Folded Card Orientation Guide
This guide shows the correct page orientation and layout for multi-page folded cards. Proper setup ensures your design prints and folds correctly, with elements in the right positions on front, inside, back, and panels.
- Pre-formatted designs from online marketplaces or customizable resources usually have orientation already correct. Just personalize your text, images, or colors—no layout changes required.
- Custom or from-scratch files: Follow the diagrams and instructions below to arrange pages in the proper reading and folding order.
For step-by-step DIY instructions, click on the link to view and download the PDF 🌿Folded Card Orientation Guide-Instructional PDF
🌿Print Product Templates
DIY designing? Right click and save these templates to your computer. Add the template to your design file to provide visual safe zone, trim line and bleed margins. Hide or delete the template before saving your pdf.
🌿Font Size & Weights
FONT SIZES & WEIGHTS
- Be careful using fonts that are too small. Anything smaller than 8 pt. may be difficult to read.
- What is true about small fonts is also true of fonts, strokes and lines that are very thin or light.
- Small, thin and light fonts may look perfectly fine on your computer screen, but may not be the outcome you are looking for when printed. This is especially true if the ink color is lighter or the paper color is darker.
🌿Fonts & Strokes
FONTS & STROKES
- Outline custom fonts and strokes to prevent substitution or missing characters during printing.
- We recommend outlining whenever exact font appearance is critical—some fonts (even embedded ones) may not transfer correctly.
- Important: Always keep your original file with live (editable) fonts separate. Save a copy, outline that version for printing, and use the outlined copy to create your PDF. Overwriting the original will make text layers uneditable.
- Submit the outlined PDF for your order.
🌿CMYK Color Mode
COLOR: CMYK Required
- Must be in CMYK color mode
- Rich Black is recommended for solid black areas and wider fonts to prevent dullness
- CMYK for rich black example: C:60, M:40, Y:40, K:100
- 100% Black is recommended for black text that is thin and/or small to prevent offsetting
- CMYK for 100% black is C:0, M:0, Y:0, K:100
Notes:
Click here for our paper CMYK Color Codes
Printing on Colored Paper: Please see White Ink Printing below to learn about white under under CMYK when printing colors on colored paper.
Color Flooding: Print designs that lay down a full color background or cover large areas with ink is known as color flooding. Color flooding on a digital press will cause the surface to take on a sheen rather than dull finish, even on matte paper. This is important to note depending on the look you wish to achieve.
If the desired result is a matte finish, we recommend choosing a solid-core cardstock and layering your color elements over a white underlay. This results in a card that is double-sided and solid core, with no white edges, and the background results from the paper color, not a layer of ink. See White Ink Printing - Why White Ink? for details and Designing for White Ink on setting up your file.
🌿White Ink Printing - Why White Ink?

White ink on colored paper, cardstock, and envelopes remains a top design choice—stunning results that are surprisingly easy to achieve.
Solid-Core Colored Paper vs. Printed Solid Background Choose solid-core colored cardstock over printing a solid-color background on white paper. Benefits include:
- A truly custom, premium look and feel that ink alone can't replicate.
- Solid color on both sides and all edges—no visible white showing when viewed from the side or during folding/handling.
- Especially ideal for rich, matte backgrounds that feel luxurious and professional.
Easy White-Only Printing (Beginner-Friendly) No special file setup needed! Design your artwork in black ink only—we translate 100% black to 100% white ink on press. Vary opacity for subtle effects or bold coverage. See 🌿 🌿Printable PDF-Designing for White Only for full details and examples.
Advanced Option: White Ink Underlay for Colored Inks For pro designers using InDesign, Illustrator, or similar: Layer white ink beneath colored (CMYK) elements to prevent paper color from shifting or dulling your printed hues. Result: Vibrant, true-to-intent colors even on dark or richly toned stocks. See 🌿Printable PDF- White Ink Advanced Options for setup instructions.
Pro Tip Pair your white-inked pieces with our premium colored envelopes—addressed in crisp white—for an elegant, cohesive presentation that makes a memorable first impression.
🌿Designing For White Ink
ALL WHITE INK OPTION (Easy Level)
-
This is the simplest way to print in white ink—no spot channels, no advanced software needed.
- White Ink Only Prints your entire design (text, shapes, graphics) using white ink exclusively. You can use varying percentages of white—from light/tinted effects to 100% opaque—for creative control.
- White Text We recommend text to be 100% black (100% K). Avoid very thin or small text.
File Setup Requirements
- Design your file using black ink only (100% black = 100% white ink on press).
- Text should be 100% black
- No spot colors or special channels required.
- Submit as a standard CMYK PDF.
For step-by-step instructions and examples, download the detailed PDF guide.
| Your file looks like this: | Your envelope looks like this! |
 |
 |
🌿Printable PDF-Designing for White Only
WHITE INK + CMYK (Advanced Level)
- White Ink 100% + CMYK –
Prints 100% opaque white behind all CMYK elements (except true black areas). This underlay preserves color vibrancy and prevents the paper from showing through colored inks.
- White Ink Varied % + CMYK
Gives full control: Apply varying percentages of white ink as standalone elements or selectively behind specific CMYK areas. You decide exact placement and opacity levels.
Important Note:
- Advanced white ink requires proper file setup (e.g., spot channels for white). It is not compatible with our complimentary variable data merge service.
- For detailed setup instructions, including software-specific steps, download the PDF guide.
🌿Overprint
OVERPRINT
- Open your file.
- Go to the View menu.
- Select Overprint Preview (or use the shortcut: Ctrl+Alt+Shift+Y on Windows / Cmd+Option+Shift+Y on Mac).
- Toggle Overprint Preview on and off to compare.
- What you see in Overprint Preview mode is how elements will actually print—including any overprinted colors, white ink underlays, or transparent overlaps.
- If colors shift, disappear, or blend unexpectedly, adjust your overprint settings (e.g., in the Attributes panel) until the preview matches your intended result.
This quick step prevents surprises like missing white ink bases or unintended color blending on colored papers. Submit your file only after confirming the Overprint Preview looks correct.
🌿Photo Cards
Choosing the Right Paper Finish
Different finishes deliver distinct looks, feels, and performance—knowing the pros and cons helps you select the best match for your project.
Whether you want vibrant, eye-catching colors, a sleek professional appearance, or a timeless matte elegance, there’s an ideal finish for every need. Click on the link to explore the most common options to guide your choice.
🌿Design File Checklist
Pre-Upload Design File Checklist
Complete this before submitting your files to avoid delays or reprints.
- ✅ Proofread thoroughly: Check spelling, grammar, punctuation, and spacing.
- ✅ File Format:
Standard (Black Ink, CMYK, White Ink Only): PDF
Advanced White Ink: PDF/X-1a:2001 or PDF/X-1a:2003 (required to preserve settings) - ✅ Resolution: 300 dpi or higher
- ✅ File Size: Maximum 50 MB
- ✅ Background: Transparent (except for intentional colored background elements). Do not submit files or design elements with a white background.
- ✅ Bleed: Add 0.25 inches to width and length beyond final trim size
- ✅ Trim Size: Matches the exact dimensions of your ordered product
- ✅ Borders: Place inside the safe zone, or extend fully from safe zone through bleed for solid borders around trimmed edges
- ✅ Printed Elements: Keep all important content within the safe zone; ensure proper cropping and alignment
- ✅ Color Mode: CMYK only. Calibrate your monitor for accurate color display
- ✅ Font Legibility: Ensure text is readable at actual print size (especially on small items)
- ✅ Fonts & Strokes: Outline all custom fonts and strokes
- ✅ Transparency & Effects: We flatten these during processing—review your file accordingly
🌿How To Order Tutorial - Follow Along!
Learn how to order custom printed cards and envelopes from Cardstock Warehouse. This guide walks you through selecting your product size, paper type, and design options to create the perfect printed cards for your needs.
View the tutorial videos below to learn about ordering Printed Cards and Envelopes.

Variable Data on Printed Products
We're currently offering free variable data merging for envelopes, place cards, and escort cards.
This service lets you personalize each piece with names, numbers, table assignments, or other details. Choose from our in-house fonts and select any CMYK color for your text.
Read on for setup details, font options, best practices, and examples.
🌿The Basics - Variable Data Merge Service
- See How to Submit Your Variable Data below for detailed instructions on using variable data template files.
- File Review
When requesting variable data on a custom design file, the File Requirements (listed above) apply to all items, including envelopes, place cards, and escort cards. Our print specialists review every submitted file to confirm it meets standards, however, to avoid delays, please double-check the design file requirements before ordering. - Proofing Variable Data
Follow the template instructions and carefully review your data (names, table numbers, etc.) before submission—accuracy prevents issues downstream.
- We send a merged PDF proof for your approval prior to printing. Proof approval is required before a job is released for printing.
- Includes initial setup + up to 2 free revisions for font style or formatting (delivered as PDF).
- Additional revisions: $10 per change
- Thoroughly proofread the PDF Proof we send—errors can occur during our data input, so your careful review is critical.
Additional Notes:
Proof Order Expiration
- If we need additional information or file corrections, your proof order stays active for 30 days from the date we contact you.
- If the requested items aren’t provided within that window, the order will be closed without refund. A new order will be required to resume processing.
Font Limitation
- Variable data merge is limited to our in-house fonts only. Custom fonts are not available for variable text fields.
- For other printing options that support custom fonts, see the Custom Fonts section.
🌿How to Submit Your Variable Data File
Follow these steps to provide your variable data.
Variable Data Merge Templates are available on their respective product pages as well as below:
🌿Variable Merge Pagination and Orientation
This guide illustrates how card files containing variable data (different information) on each printed card should be formatted and paginated. Illustrations below are for both one-sided print (Simplex) and two-sided print (Duplex).
🌿Font Options for Variable Data Products
When choosing to have us merge your variable data, you will choose from the following font options. CMYK colors can be provided for color ink printing.
Note: Advanced White Ink Printing options (White + Black/CMYK) are not available with this option.

ENVELOPE PRINTING

PLACE AND ESCORT CARD PRINTING

🌿Custom Fonts
- Envelopes or Place Cards / Escort Cards containing custom fonts or advanced white ink printing (White + Black/CMYK) cannot use the variable merge option.
- Designs using custom fonts or advanced white ink printing must be submitted as a merged and properly formatted pdf file.
Anatomy of an Invitation
and day-of stationery goods

- Regular price
-
$0.60 $1.00 - Regular price
-
- Sale price
-
$0.60 $1.00
- Regular price
-
$0.65 $1.52 - Regular price
-
- Sale price
-
$0.65 $1.52
- Regular price
-
$1.85 $2.22 - Regular price
-
- Sale price
-
$1.85 $2.22
- Regular price
-
$0.65 $1.52 - Regular price
-
- Sale price
-
$0.65 $1.52
- Regular price
-
$0.60 $1.00 - Regular price
-
- Sale price
-
$0.60 $1.00
- Regular price
-
$7.50 - Regular price
-
- Sale price
-
$7.50
*prices do not reflect volume discounts
Invitation Physiology 101
Invitation styles are endless! Highlighted here the most common elements found in today's popular invitations.
🌿The hotspots on the image above will take you to the product pages for each of the pieces. You will notice that some of the hot spots direct you to the same product page. Here's why . . .
For ease of ordering, you will find all sizes of a product on one product page - for example: Flat Panel Cards used for the main invitation, as well as the Insert Cards and RSVP cards are located on one page with selections for sizes, paper and print options.
🌿Simply select your product size, paper and print options, and upload your files for each product from the same product page.
🌿As noted above, each product will be available in a range of paper and print options. If you do not see the desired options for your print project, contact us with the details.

- Regular price
-
$1.65 $2.00 - Regular price
-
- Sale price
-
$1.65 $2.00
- Regular price
-
$1.50 $4.00 - Regular price
-
- Sale price
-
$1.50 $4.00
- Regular price
-
$1.50 $4.00 - Regular price
-
- Sale price
-
$1.50 $4.00
- Regular price
-
$1.20 $2.05 - Regular price
-
- Sale price
-
$1.20 $2.05
- Regular price
-
$0.36 $1.30 - Regular price
-
- Sale price
-
$0.36 $1.30
*prices do not reflect volume discounts
Principle of Complementarity
"You cannot have one without the other"
Your invitation has gone out and it's time for the big day. Highlighted here are some of the other pieces that will make it complete!
🌿As noted above, each product will be available in a range of size, paper, and print options. If you do not see the desired options for your print project, contact us with the details.