


I am sending a HUGE truck of love your way!! Christmas is over (🥺) so now we must be moving on to the season of love, lol! So, I am starting off 2022 by sending love your way!! AND I also have free SVG‘s to share. Why? Because I love you… 🥰🥰 I’m so proud of this project. What makes it even better is the beautiful color cardstock combo I’ve selected for this project. It’s not your traditional Valentine's Day colors and that’s what makes it pop! Do you want to send someone A Special Delivery? If not, then send yourself one. You can make this project and use it as Valentine Home Decor. You can also choose completely other colors for a different season… Ready to get started? Here we go…
Supplies:
- Cardstock Warehouse Cardstock Papers
- Razzle Berry Pop-Tone 100lb
- Park Green Colorplan 100lb
- Imperial Blue Colorplan 100lb
- Silver MirriSparkle 104lb
- Smart White 80lb
- Free SVG files
- Click the link, then right-click to save to your computer
- Scor-tape
- Hot glue gun and glue sticks
- Zip dry wet glue
- 3-D foam dots
- Small heart punches (optional)
- Yarn or string (optional)
- Acetate (optional)
- Silver Stickles or Puffy Paint (optional)
Let’s start by importing the SVGs into your cutting software for cutting and printing out all of the files. If you are using a Cricut, you will need to convert the "basic cut" lines to "score" lines and then "attach" them to their respective pieces. Here is a quick video showing you how:
Now you will cut everything out. Here are my color choices:
- Truck Base- Park Green
- Truck Detail Panels- Imperial Blue
- You can cut out the detailed version which appears as dark blue in the file, or the single layer version, which appears as lavender in the file. You can also use both.
- Hearts and Boxes- Razzle Berry
- Letters- Silver MirriSparkle
- Sentiments- Smart White
Sidenote: the iridescent paper (Feb 14 offset) is from my scrap stash. I would have preferred to use Silver Mirror but I didn’t have any. I do now, though! ☺️

Take the two main truck bases and apply double-sided tape around the windows if you want to add acetate. This is optional but makes them look more like real windows.

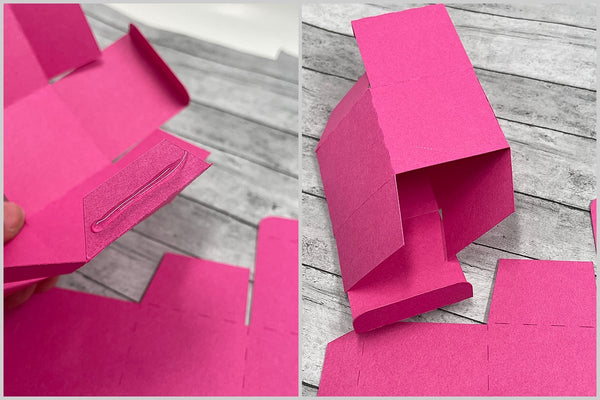
Take the two rectangle pieces and fold over at the edges per the perforated/score marks. Take a pair of scissors and cut little slits up until the fold line, just on the sides. Do this for both pieces.

Take the larger piece and fold mountain valley style as shown below. The first fold goes down and the second fold goes up. It follows the shape of the first half of the truck.

Starting at the fender, carefully attach the side flaps that you slit to the base of the car. The folds indicate where the curve is on the truck.

Continue to follow along over the window/acetate.

This piece covers the first half of the truck. After you go over the window, continue straight down towards the bottom of the truck.

When you’re done connecting to the long rectangle piece you should end up with something like this.

Now grab the shorter rectangular piece. To make things a little easier, cut off the side edge flaps to make folding a little bit better.

Fold down the edge and connect to both the base of the truck and the back of the previous rectangle. Stick them together at the same time.

That end piece should look like this:

The entire side should look something like this:

Glue the remaining side of the truck to the remaining tabs.

Now it's time to layer the side pieces and attach them using zip dry glue. You have the option in the svg file to cut out detailed layer pieces or a solid piece for either side, or both. I cut out the detailed layer pieces for the left and right sides.

This is how they should fit together:

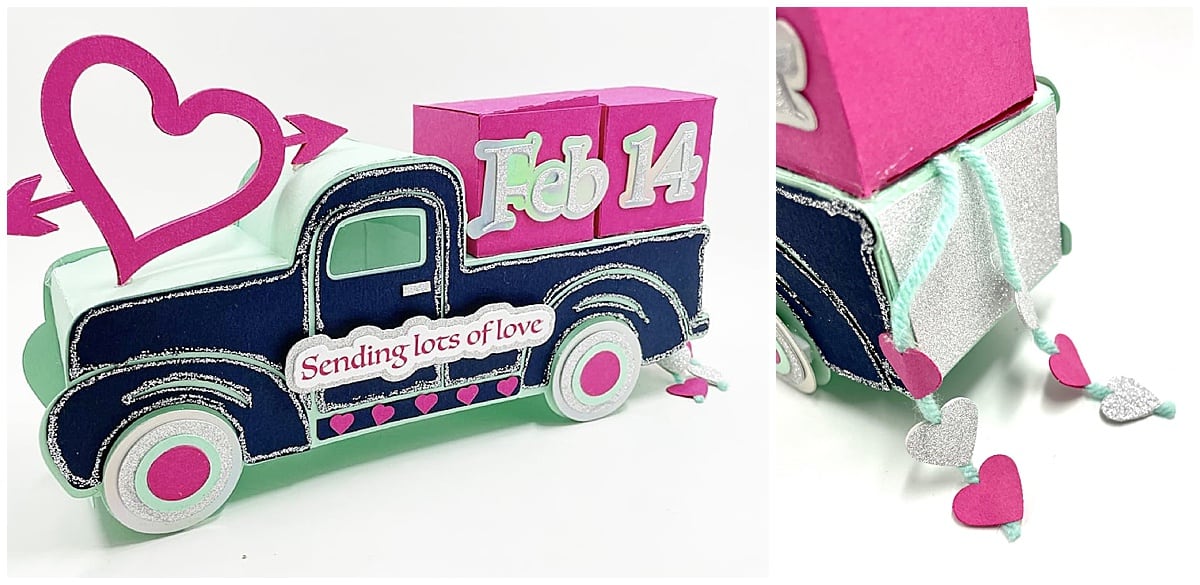
Now you can put your tires on. The photo below shows the order in which I placed my tires. I added a pop dot to the entire tire to make it stand out.

Now it’s time to add the boxes to the truck. Take your box pieces and fold over all of the perforated/scored lines. (23)

Using hot glue or Scor-tape, attach the box together. Add adhesive to the side flap and attach to the opposite side of the box.
Permanently close only one end of the box.

Layer your month and date on top of the offset pieces and apply them to the boxes. The month goes on one box and the date goes on the other.

Print out your sentiment, "sending lots of love," and layer it on top of the offset. I used the print-then-cute feature for the sentiment, then I layered that on top of the glitter paper.
After I layered all the pieces together I applied foam pop dots to the back.

I cut out my heart with the arrow eight times because I wanted it to be super thick. I applied them together using Zip Dry wet glue.

I wanted to make a little trail of hearts behind the truck so I grabbed two punches from my stash… very old punches... and used my scrap cardstock to punch out little hearts. This is optional, but I think it adds a nice touch. You could also cut out hearts with your machine.

I grabbed some yarn and applied my hearts back-to-back with the string in the middle to make my little trail.

I applied a little silver sparkle rectangle to make a little “ back license plate.”

To hide the yarn, I glued the string underneath one of the boxes and cut off the excess.

I glued both of the boxes to the back of the truck with hot glue.

I added an outline of stickles (optional) and the sentiment to the truck. I added tiny hearts to the bottom of the truck for decoration.

Add the heart die-cut to the hood of the truck at an angle. I used hot glue for this so that it would stand up.

Voila, we’re done! By leaving the tops of the box open you are free to add candy, treats, or whatever you like for the recipient. You can also permanently close these if you want this just for home Decor. Here is the finished project. Sending you lots of love!!
I hope (as always) that you enjoyed this project and will enjoy the SVG files. It was really fun to create!! Happy Valentine’s Day to you all ❤️❤️
Please be sure to leave a comment to let us know what you think. If you are super fancy - tag us in your creations on Facebook or Instagram. You can use the hashtag #CardstockWarehouse to be featured on our page!
Tootles!
Tmika
YouTube
Instagram
Pinterest
Facebook
Looking for more Valentine's Day inspiration? Find all of our Valentine's Day blogs HERE!