


Do you ever dream of something that seems impossible or something that will never happen? Like becoming a chunky unicorn, or skydiving from the moon? NO? Maybe, it’s just me. I’m okay with that. My dreams are most often happy and fluffy!
Today we are dreaming of a Shabby Summer Camper Oasis. Sounds wonderful, right? Yeah, I know..me too!! Imagine (if you are a shabby lover like myself) you are driving down an endless road, wind blowing, drinking a very pretty cold fruity drink (with a little umbrella) and your camper depicts your favorite craft style or paper collection. Wouldn't that be AWESOME?? Yeah, I thought so too. But it would look weird rolling down the road with tons of pretty flowers and stuff floating all around your vehicle. Trust me - I’ve seen the “flower” vans (yikes). So until then, close your eyes and envision our trip together, having fun, drinking fruity drinks, crafting and laughing in our Shabby Summer Camper. But first, we’ll need a visual. Let’s make one...
SUPPLY LIST
- Cardstock Warehouse Cardstock Papers
- Sirio Ultra Black
- Limone
- Stardream Rose Quartz
- Mirror Gun Metal
- Pure White 80lb (for printing plaid and script patterned papers)
- Printer
- Camper SVG File from Designs By Miss Mandee (free)
- Scor-Tape
- Hot Glue
- Pop Dots
- Shaker Mix
- Clear Vinyl
- Sewing Machine (option for shaker)
- Patterned Paper
We are going to be using a Camper cut file from Designs By Miss Mandee. A lot of her files are free and they are so cute!
What I will show you today is how I put mine together with the color combination that I used, and the little details that I added.
For my camper bases, I used this beautiful wood patterned paper that I had in my stash. I stitched two pieces of clear vinyl together and wedged a beautiful coordinating shaker mix in between the two and stitched closed. These will go in my window.

I then cut the bottom half of the camper out in a contrasting piece of patterned paper. This one is a checkered pattern that I found online and printed onto Pure White paper. The 80lb Pure White paper is perfect for creating your own patterned paper!

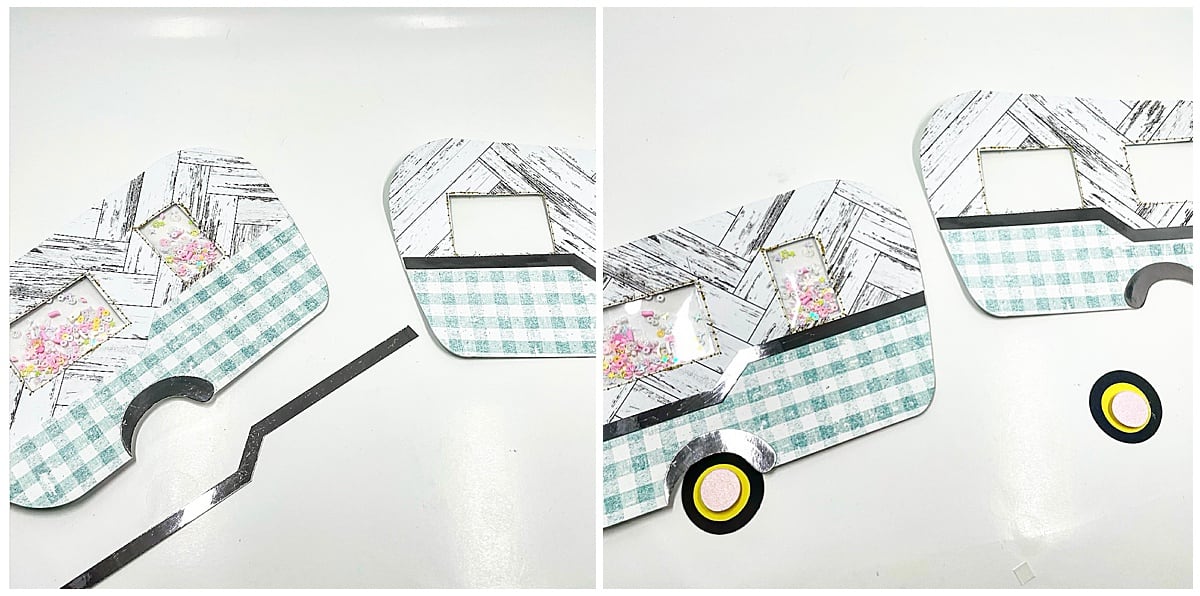
I used Sirio Ultra Black, Limone, and Stardream Rose Quartz cardstock to make the awesome camper tires. I laid a pop dot underneath the smallest circle, which in my case is the Stardream Rose Quartz. I then cut out the rims for the tires. For this I used Mirror paper in GunMetal.

I also used the gun metal mirror paper to add some contrast between the top and bottom layers of the camper for the fancy striping. I completed both sides of the camper and attached those parts together.
Now we have to find a way to somehow get in and out of the camper, right? LOL! Insert windows, curtains and doors. I used patterned paper for the window and door designs but my base is the Sirio Limone. I popped the door up with a little bit of dimension. Isn’t it cute?

Now it’s time to connect the two completed pieces together. I printed some script pattern paper onto Pure White and added it to the middle portion of my camper. I also wanted to add a shaker mix to the windows. We have to match all the windows together, right? Once I stitched the windows together, added the sequin mix, attached the script paper to the bottom and the spare tire… It turned out really cute.

So, when that sun hits we will need something to cover and shield our eyelids… So we have to make our awnings. It looks intimidating at first, but it’s really easy to put together. Make sure you cut out all the pieces in the colors that you desire. I used the checkered pattern and the Limone again. The color is so vibrant. I love it! Also included in the shot are the doorstep and the trailer hitch parts. I added one awning to the front of the camper and one to the middle. I also finished the doorstep and the trailer hitch attachment… Or at least that’s what I’m calling that pointy stick thing, LOL! This is what you should have.

Now it’s time to join the two camper bases together. I used double-sided tape to help me guide the little perforated prongs gently along the curves of the camper. Once you have them where you want them go ahead and use your bone folder to adhere them down securely. This is what it looks like on the inside and standing up. Repeat the steps to the other side of the camper.

Tip: For the small area underneath - I just cut down some paper to cover it. No one knows it’s there. Shhh….Here is your rearview.

It is now time to have the most fun! The decoration! I fussy cut some elements out of the patterned paper that I used for the camper and added some pop dots to add layers and dimension. I love how the front turned out!

Don’t forget to add the little stop to hold the trailer level. You do realize I’m making up these parts, right? 😂 I cut mine out in the gun metal mirror paper.

Ta-Da!! All done! Now it’s time to enjoy your shabby summer oasis!

Please be sure to leave a comment to let us know what you think. If you’re super fancy – tag us in your creations on Facebook or Instagram. You can use the hashtag #cardstockwarehouse to be featured on our page!
Toodles!
Tmika