


Party decorations have come a long way in the last few years, and one of my favorite recent trends is 3D Letters! You can use them blank, or decorate them to fit any theme, and you can even use them as home decor! Today I am going to make some 3D letters that spell "CREATE" and have little craft supplies on them for my craft room. The Cardstock Warehouse 100lb papers are perfect for these letters because it makes them nice and sturdy. Let's get started!
Supplies
- Cardstock Warehouse Cardstock Papers of your choice. I am using:
- Razzle Berry Pink Pop-Tone 100lb
- Grape Jelly Pop-Tone 100lb
- Blu Raspberry Pop-Tone 100lb
- Sour Apple Pop-Tone 100lb
- Lemon Drop Yellow Pop-Tone 100lb
- Orange Fizz Pop-Tone 100lb
- Gold Mirror 100lb
- White Diamond Print Glitter
- Merry-Go-Round Multi-pack (for craft supply die-cuts)
- Sweet Tooth White Pop-Tone 100lb
- Blueroom Custom Crafts 3D Letter Die Cut Files
- You can also find 3D letter cut files on Cricut, Silhouette, Creative Fabrica, etc. I just really like the shapes of the ones from Blueroom!
- Liquid Glue
- Foam Tape
- Die cuts or embellishments of your choice for decorations
- Dry rice (to weigh down the letters)
- Optional- small clothespins
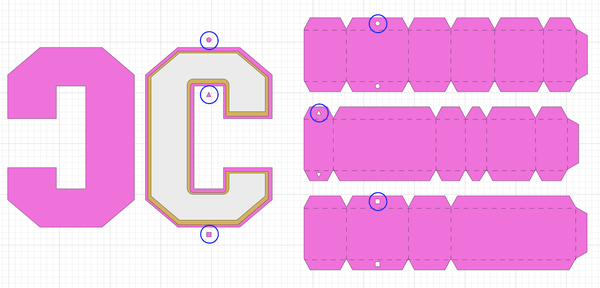
The first thing you will need to do is download the SVGs linked above and upload your chosen letters to your die-cutting machine software. I am going to be spelling out "CREATE." Once you have your chosen letters uploaded, you will need to change the "cut" lines on the side walls of the letters to "score" lines. (SVGs do not distinguish between score and cut, so they will always default to cut.) You can do this by hitting the "ungroup" button, selecting the lines on the panel on the right, and then changing them to "score" in the dropdown menu in the top left. After the lines have been changed, select the lines and the letter walls and click "attach" to ensure they stay together on your cutting mat.
Once you have all of your letters uploaded and the score lines converted, choose you colors for your letters and layers. I cut the top layer out of White Diamond Print Glitter paper, the second layer out of Gold Mirror paper, and then the letters our of 100lb 12x12 Razzleberry, Grape Jelly, Blu Raspberry, Sour Apple, Lemon Drop, and Orange Fizz.

Now it's time to cut out all of your pieces! Don't forget to put your scoring tool in your machine before you hit cut.

To assemble your letters you will want to start by folding the tabs in on all of the score lines. Before you start gluing, make sure you line up the shapes on the tabs with the shapes above and below the letters on the files. I kept my Cricut screen open while I was assembling so I could reference it.
I used a strong liquid glue to attach the tabs to the bases of the letters. As I was attaching them, I used tiny clothespins to hold the tabs in place. Before you add the top layer to your letter to close it off, put about 1/4 cup of dry rice in your letter. This will weigh down the bottom when you stand it up so that it doesn't fall over. This is especially important if you plan to use your letters outside. If you do not have rice, you can also use small pebbles or dried beans.

Once you have the base of your letter assembled, it's time to add the layers. I layered the White Diamond Print Glitter letter on top of the Gold Mirror with foam tape and then used foam tape again to layer it onto the 3D letter base. This gives your letter layers some great dimension.

Repeat these steps with all of your letters until you have a full set. You can stop here and use your letters for decor, or you can continue on and decorate your letters.

Now the fun part... decorating! I used my iPad Pro and Apple Pencil to draw some cute little craft supplies and imported them into my Cricut machine. I also used a few designs from Design Space like the glue gun and the scissors. You can use whatever die-cut or embellishments you want. I used the Merry-Go-Round multi-pack and Sweet Tooth White papers to cut out my craft supplies and then glued the pieces together using liquid glue. I also die-cut a bunch of tiny stars.

Then, I randomly placed my die-cuts on my letters using foam tape and liquid glue. Look how cute these turned out! Once I had my paper embellishments added, I added a few paper star clusters to each letter.

Are you more of a visual learner? You can view the entire process on our YouTube channel!
What do you think? Are you ready to create your own 3D letters? Be sure to show us if you do! Tag your creations on social media with #cardstockwarehouse to be featured in our stories! While you're there, be sure to follow us on Facebook and Instagram for more paper crafting projects made with our high-quality card stock.
Happy Crafting!
Erica (@wanderfuldesign)
4 comments
Hi, I want the mold please
What paper did you use for the ruler and the paint palette?
Hi Chris,
The link is in the supply list at the top of the blog :-)
-Cardstock Warehouse
Hi
I could not find the link for the 3d Letters
greets