


Hey, everyone! Melissa here from @diy_melissa and @sweetbuttercupdesigns. Spring is almost here and that always gets me excited for the flowers to start to bloom. My favorite flowers are Gerbera daisies, and I recently discovered that Creative Fabrica has an awesome 3d daisy file, so I decided to give it a shot!! I absolutely love how these paper ones turned out, and they were super easy to make! All it takes is some Cardstock Warehouse paper and a little patience! So let's get started on how to make these gorgeous paper blooms!
Supplies:
- Cardstock Warehouse Cardstock Paper:
- Woodstock Rosa & Pistacchio 83lb
- Hot glue gun + glue sticks
- Floral wire
- Floral tape
- Quilling tool
- pencil, dowel rod, or bone folder (for curling petals)
- Die Cutting Machine (Cricut or similar)
- Cut file: 3D Paper Daisy Flower from Creative Fabrica
You'll start by uploading the file to your electronic die cutting machine and resizing the pieces to the size of flowers you want to make. When resizing, make sure you have ALL of the pieces selected so that they resize proportionately. I decided to use Rosa for my petals and Pistacchio for my leaves because they are such vibrant spring colors!
Once you have your pieces cut, take the 3 largest flower petals and use your dowel rod/hot glue stick/bone folder to curl the petals down. They should look like this when they are done.
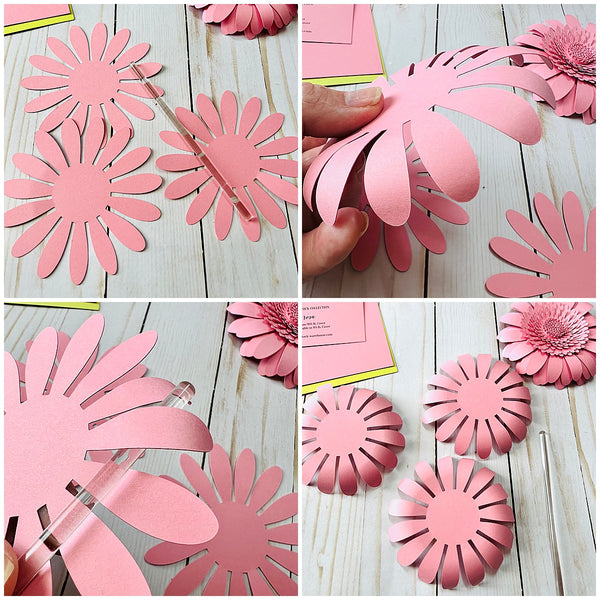
Now you are going to stack those 3 sections on top of each other and glue them together using hot glue or liquid glue. I like to use hot glue for paper flowers to ensure that they hold up for a long time! (The best part about paper flowers is that they never die!) I like to offset the petals so it gives the flowers a more realistic look. Once you have them glued, you can reshape the petals a bit to get them the way you want.

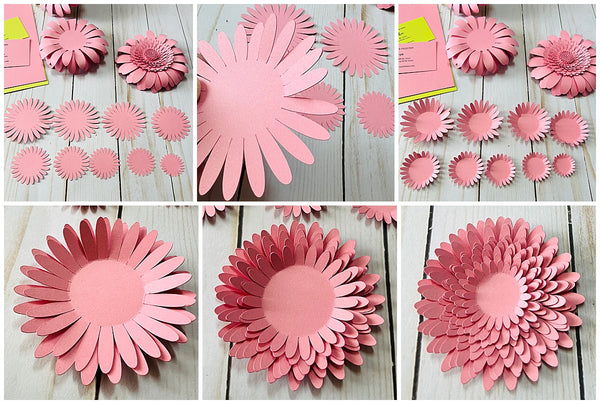
Now you can work on the smaller petal pieces. Take the 9 different sized petals and bend the petals up on all of them. Then you will stack them and hot glue them together like the previous layers. I also offset these to make them look more like a real flower.
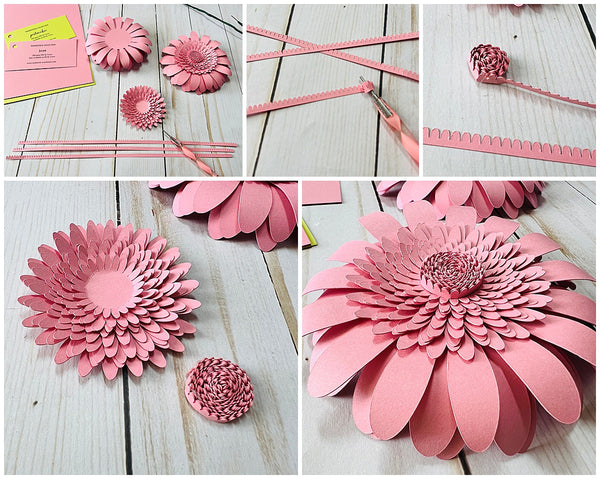
Now take the 3 long strips and use a quilling tool to roll them up. Start with the first strip, roll, and glue every so often as you go. Once you reach the end of that strip, glue the next strip on where the first one ended and continue to roll and glue. This creates the center piece of your flower. Hot glue this to the center once it is fully rolled.
Now let's make the stem! Make a loop at one end of a piece of floral wire and hot glue it to the center of the back of the flower. Make sure you use enough glue to ensure it's not going to go anywhere.
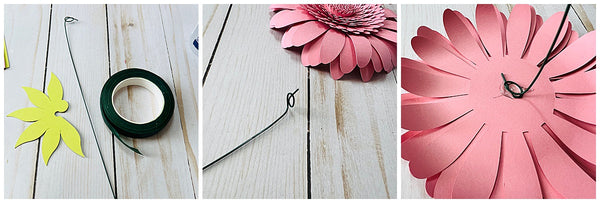
Take your floral tape and wrap the stem all the way down. Once you have it all wrapped, take the leaf, shape it a bit, and put it on the back of the flower with hot glue. I decided to just use one of the big leaves, but you can use as many as you like. You can also add some leaves further down the stem if you like, but I did not since I am putting mine in a paper rain boot vase.

That's it! Now your paper flowers are ready to display! I put mine in these gorgeous 3D rain boots that I made using Blossom Lessebo Colours paper and a file from SVGCuts.

I hope I have inspired you to Make Something Beautiful® today! Making any fun paper crafts for spring? Be sure to show us on Facebook and Instagram! You can tag your creations with #cardstockwarehouse to be featured in our stories.
Happy Crafting!
Melissa
Instagram: @sweetbuttercupdesigns & @diy_melissa
Etsy: Sweet Buttercup Designs