


As much as I enjoy technology, when it comes to lists, I prefer paper. I keep small pads throughout the house to write reminders to myself. I keep a list in my craft room of tasks that I need to complete on a 6” x 9” writing pad. For this project, I decided to “dress up” my to do list by building a folio out of cardstock and chipboard to keep my crafty notepad looking pretty! The folio has a 1” binding and folder pocket, perfect for holding any loose notes.
Blog Supplies:
- Cardstock Warehouse Cardstock Papers in Sirio Color Gialloro
- (1) 12 x 12 Medium Weight Chipboard
- (1) 6” x 9” Writing Pad
- Scoring Board & Bone Folder
- Scor-Tape
- Liquid Adhesive
- Paper Trimmer
- Ruler
Cutting Guide (width x height):
Chipboard:
- (2) 7” x 10” - Front and back cover
- (1) 1” x 10” - Binding
Cardstock:
- (1) 16 ¼” x 11” - Cover - Made from (2) 8.5” x 11” (adhere together using ¾” score tape)
- Score landscape @ ½”, 7.5”, 7 ⅝”, 8 ⅝”, 8 ¾”, 15 ¾”
- Score portrait @ .5”, 8”
- (2) 6 ⅞” x 9 ⅞ Inside Cover
- (1) 2” x 9 ⅞” Inside Cover Spine
- (1) 8.5” x 11” for Cricut or (1) 6 7/8 “ x 8.5” manually cut for - Left Inside Pocket/Folder
- (1) 6 ¾” x 8 ⅞”, scored portrait at ¼” and 8 ¾” - Right Back Pocket for Notepad
To get started, I first cut the chipboard as indicated in the cutting guide above. Next, to create the 16 ¼” x 11” Gialloro cover, I adhered two sheets of the cardstock together (one on top of the other), portrait using ¾” of scor-tape (you can use ½” and ¼” scor-tape next to each other).
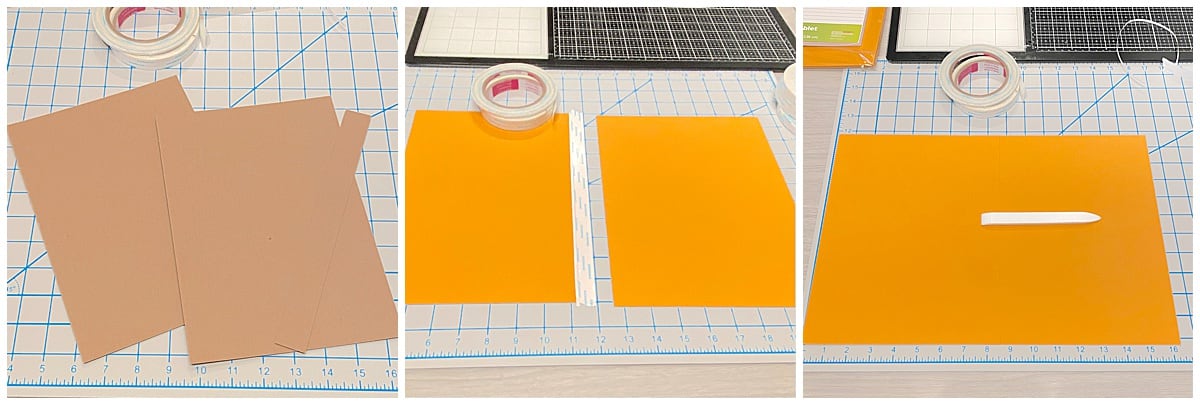
I scored the inside cover landscape @ ½”, 7.5”, 7 ⅝”, 8 ⅝”, 8 ¾”, 15 ¾” and portrait @ .5”, 8”. Using a bone folder, I folded the ½” margin on all sides of the cover. I then adhered the chipboard using liquid glue inside the score lines, leaving the 1/8 “ margin between the spine and covers.

I applied ¼” scor-tape to the outside margin on the cover and cut the corners as shown below. I removed the backing on the scor-tape and folded down the outside margins.

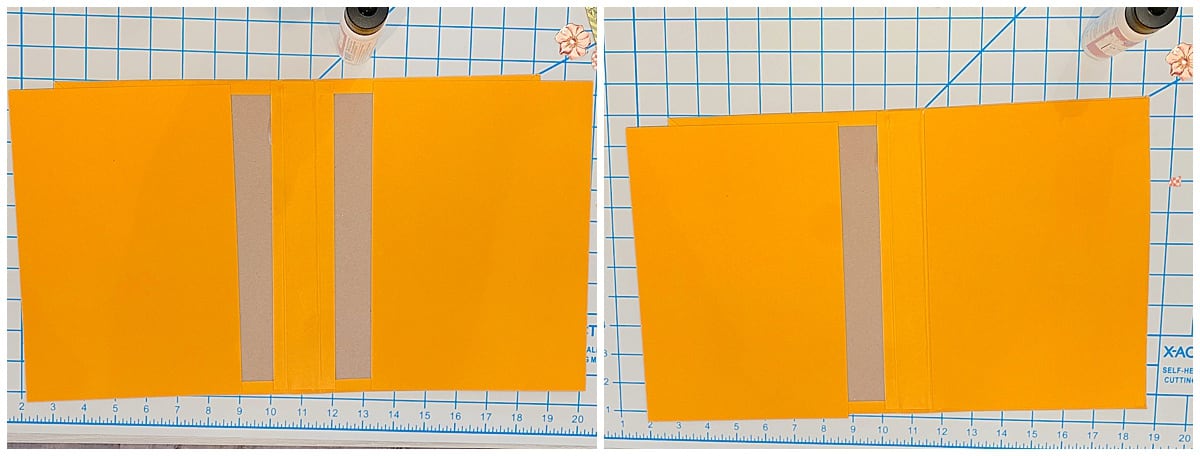
The inside cover was assembled from three sheets of cardstock - two pieces of cardstock to measure 6 ⅞” x 9 ⅞” and one 2” x 9 ⅞”. First, I scored the 2” x 9 ⅞” piece of cardstock at .5” and 1.5”. I adhered it using liquid adhesive over the center spine in the inside cover aligning the score lines on the cardstock with the scores on the outside cover. I then adhered the 6 ⅞” x 9 ⅞” to the right and left inside covers.
To create the left inside pocket, I created a cut file in design space (you can download here). Alternatively, you can simply create a pocket which is 6.875” wide and 8.5” tall, with a triangle cutout as indicated in the image below. If you are planning to decorate the inside cover of your folio, do so now before adhering this pocket. To adhere the pocket, I placed glue on the right, left and bottom of the pocket, and let the rest of the pocket unglued.

To create the right pocket to hold my writing pad, I cut one right inside cover 6 ¾” x 8 ⅞”, scored portrait at ¼” and 8 ¾”. Fold the ¼” margins on each side and apply scor-tape. I removed the backing and adhered this to the right inside cover, leaving approximately a 1” space at the top. A reminder, if you would like to decorate the inside cover, do so before adhering! The writing pad backing should fit inside your pocket.

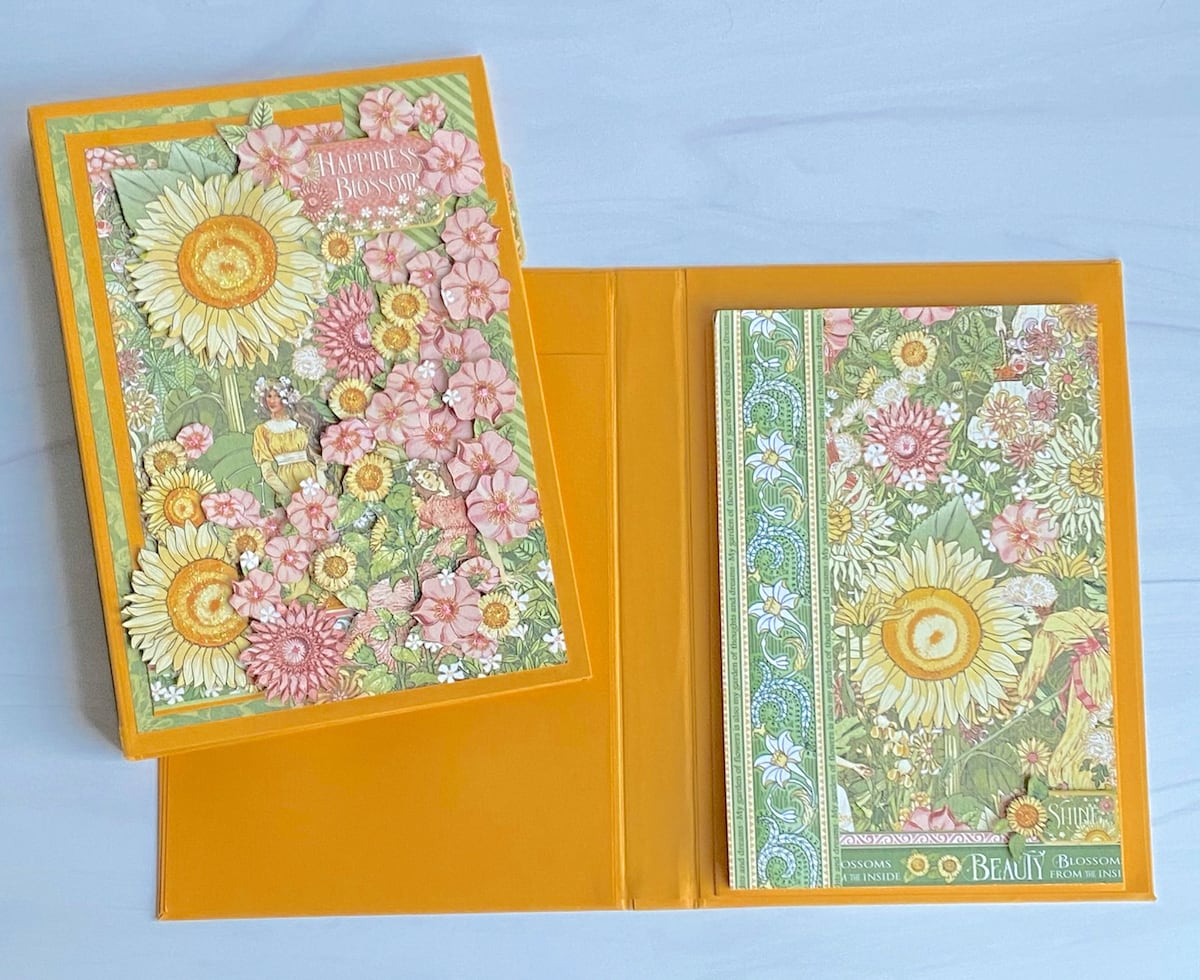
The last step is to decorate your folio how ever you choose. I used the same coordinating papers to decorate the inside. Once the inside was done, I decorated the oustide. You can, of course, leave any parts you want blank and just show off the beautiful cardstock.
What are you crafting right now? We'd love to see! Show us your creations on Facebook or Instagram. Use hashtag #cardstockwarehouse for a chance to be featured in our stories!
Happy Crafting!
Traci Selig
IG: @tracicrafty
Blog: www.tracicrafty.com