


Hi, Crafty Friends! Amanda here from @lacedesignsstudio! I'm excited to share with you an awesome decorative statement for your graduate this season, or a small, lovely gift box shaped like a school locker. This box opens, holds a cute little graduation gown, and can be used for several gifting options.
Supplies:
- Cardstock Warehouse Cardstock Papers:
- MirriSparkle: Gold Touch, Silver
- Mirror: Rainbow Holographic
- Stardream Metallic: Lapis Lazuli, Crystal, Onyx
- Colorplan: Azure Blue, Bright Red
- Sirio Color: Iris
- Files:
- Cutting Machine (I'm using a Cricut)
- Adhesives
- Bearly Art® Glue
- Double-sided Adhesive
- Foam tape (Optional)
To begin this project, you’ll need to upload the SVGs in the list above into your Cricut or preferred cutting machine. I worked on this set with each file separate, and then I added the year, hanger, and lock from Design Space. I also created a shelf with a cut-out for the hanger to hang from. These add-ons are accessible at the add-on link above. If you don't have a Cricut, you can search your machine's software for a lock and numbers you like, and you can create a small shelf using a small strip of paper.
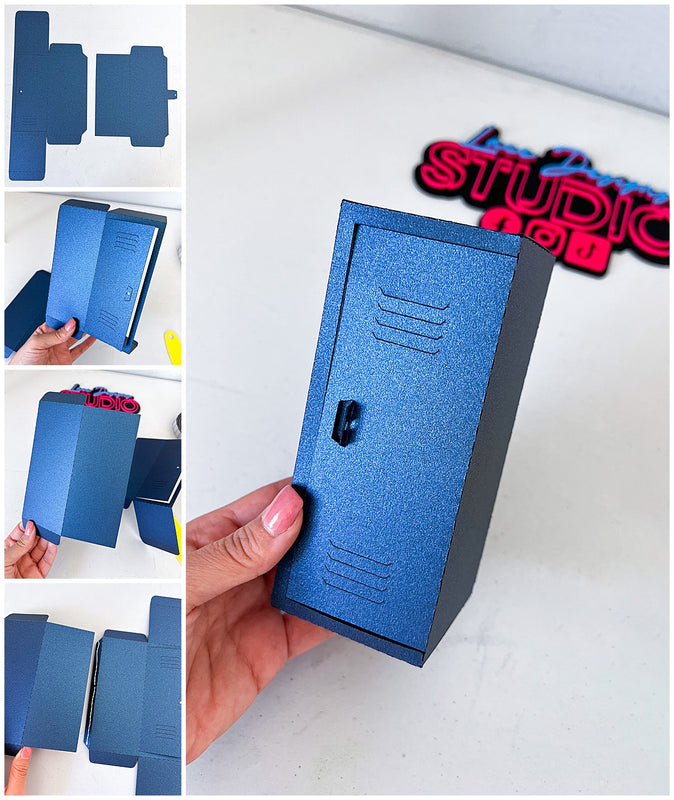
We’ll begin assembly with the locker which is super simple to put together. I cut the pieces for the locker with Lapis Lazuli Stardream because it is so sturdy and also a beautiful, shimmery color. Fold all of your pieces at the score/dashed lines, and then glue the edges together so they form a box. The top and bottom of the locker don’t need to be glued, as they can simply be inserted to close. This really couldn't be easier!
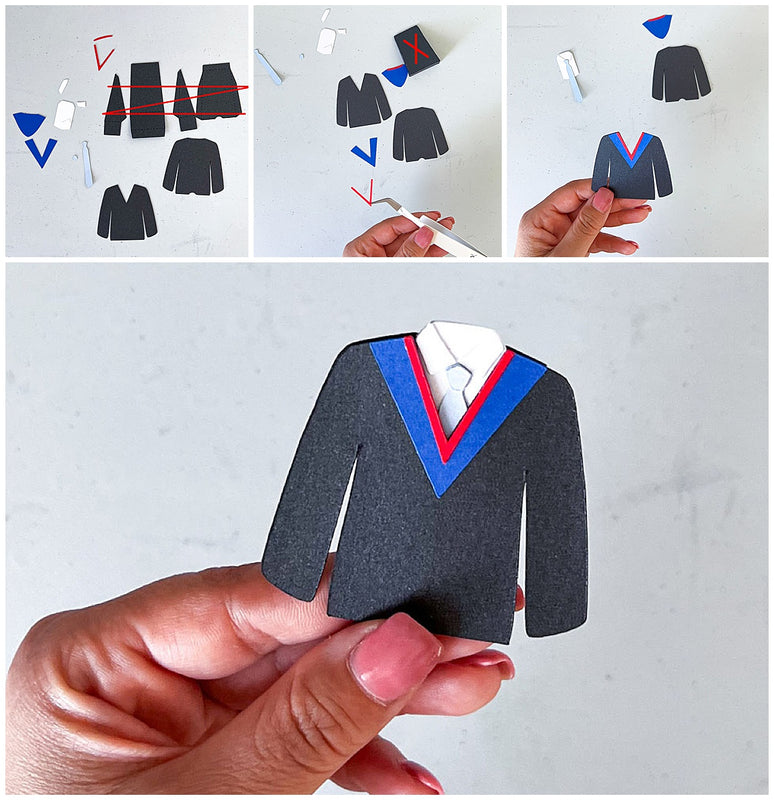
Once your locker is complete, you can set it aside. We’ll work on the gown next. The file comes with a small box that can be used in between the front and back of gown, however, I wanted the gown to hang from the shelf and so I didn’t use the box. I have crossed out the unnecessary pieces in the photo below. (*Make sure the width of the gown fits into the locker before cutting, since we’re using two separate files.*) I cut my gown out of Onyx, Iris, Crystal, Bright Red, and Azure.
I started by directly gluing on all the small pieces to their respective parts; the shirt color onto the shirt, the small “V” onto the larger one, etc. and continued for both, the front and back of the gown.
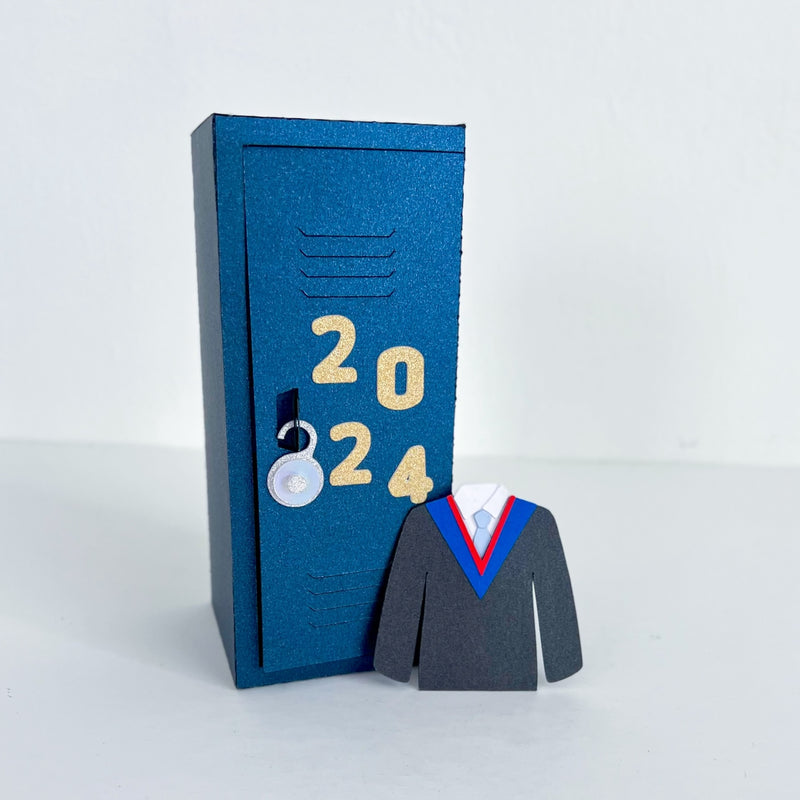
After the gown was complete, I grabbed the shelf, folded along the dashed lines, and glued into the locker, one side at a time. You can place this as high or as low as you’d like, or you can also add multiple shelves if you’d like. I also layered the Rainbow Holographic hanger and placed a bit of double-sided adhesive along the bottom of the hanger for the gown to stick to. I looped the hanger through the cut-out of the shelf and attached the gown directly on it.

Finally, I glued the year to the front of the locker box and assembled my lock (Rainbow Holographic and Silver MirriSparkle) using thin foam tape between each layer before looping it through the locker door holes. I love the tiny lock details!
Now your locker is ready to be gifted. You can give it as a gift by itself, fill it with candy or small gifts, or tuck a gift card inside. No matter what, your graduate is sure to be impressed!
I hope this inspired you to Make Something Beautiful®! Follow me at @lacedesignsstudio for more party and paper decor ideas, and share your creations with Cardstock Warehouse on Facebook and Instagram! Tag your projects with #cardstockwarehouse to be featured on our page!
Happy Crafting!
Amanda (@lacedesignsstudio_)