


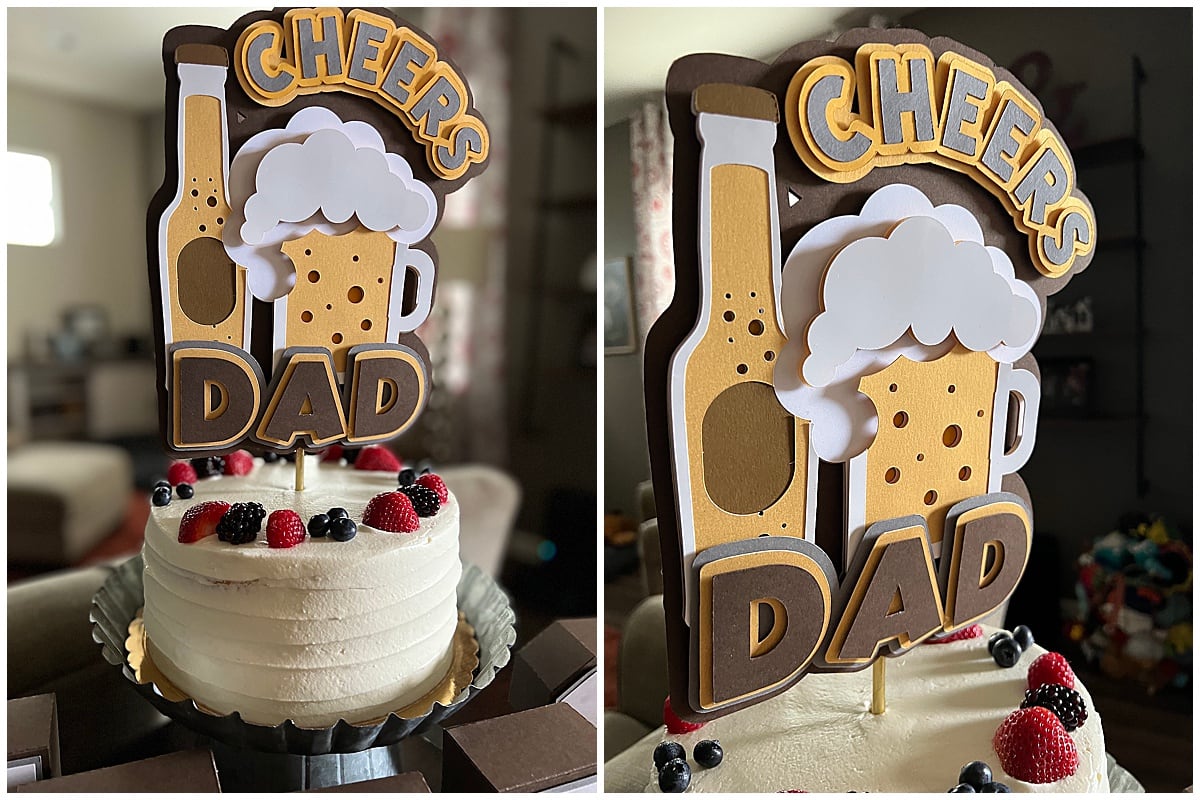
Cheers & Beers for Dad!! How fun is this 3D Cake Topper & 3D CHEERS letters for celebrating Father’s Day or Birthday?!?
I would love to show you how I made this 3D cake topper!!Let's get started!
Supplies:
- Cardstock Warehouse Cardstock Papers
- Brown Speckletone 100lb
- Chocolate Speckletone 100lb
- Kromekote Glossy White
- Gold Metallic Stardream
- Gialloro Sirio Color 80lb
- Bright White Colorplan 100lb
- Smoke Grey Colorplan 100lb
- Glue & Hot Glue
- Double-Sided Foam Dots
- Paper Straw or Wood Stick
- Die Cutting Machine (Cricut or similar)
- Beer Bottle & Mug Cricut Images
- Font from Cricut
- Craft Tweezers (optional)
First, I found a beer image from Cricut Design Space that I wanted to use that had lots of layers. I picked out a font I liked and used the offset set button to create 3 layers. For the “cheers” I used the curve option to curve it over the top of the beer foam. Next, I arranged it to my liking and grouped it all together and used the offset button over the entire image to create a backing (the large Chocolate Brown piece).

All of the colors I used are listed above. Once you have all the pieces cut out you can start layering and pop dotting.

First Layer:
Glue the grey Cheers onto the Gialloro. Add pop dots to the back of the Gialloro and adhere to the Gold Metallic layer. Once you have this step finished, set it to the side.

Second layer:
Pop dot the back of the Chocolate Speckletone DAD and layer onto the Gold Metallic DAD and repeat the same process with the Gold Metallic DAD and layer on the Grey Smoke layer DAD and set aside.

Third layer:
Ok now that all the words are done, you can start layering the beer bottle & mug!
Glue together the Gialloro, Bright White, and Smoke Grey layers.

Glue the Gold Metallic beer bottle to the Brown Speckletone layer. Then pop dot the back of the Brown Speckletone bottle layer onto the Bright white layer. Repeat the same step with the back of the Gold Metallic beer mug.

Once you have all the beer layers done, glue on the Kromekote Gloss White outline piece.

Pop dot the back of the Kromekote Gloss White beer foam piece and layer it on the Gold Metallic beer foam.

Now it's time to start assembling the cake topper. Take the beer bottle & mug layer and pop dot the back of it and layer onto the Chocolate Speckletone back.

Repeat this with “DAD” & “CHEERS”

Once you have all the pieces on, you can glue the paper straw between the two pieces of Chocolate Speckletone backing. You want to make sure you have two of these cut out.

Now it's time to celebrate Dad!!
As a bonus, I also made some 3D Cheers Letters. I found a beer image digital paper to print on the Kromekote Gloss White. I love this cardstock because it has a glossy finish to it and makes a nice finish touch. I used Chocolate Speckletone Brown and the 3d letter files from Auntie Tay to make these letters.
*Printer capabilities vary by printer. We recommend ordering sample sheets to test your printer before ordering full packs of paper.*

What are you crafting for Father's Day? Be sure to show us on Facebook and Instagram! You can tag your creations with #cardstockwarehouse to be featured in our stories.
Happy Crafting!
MelissaInstagram: @sweetbuttercupdesigns
Etsy: Sweet Buttercup Designs